Single Sign-on |
|
|
If your question is not addressed below, please contact us through our support form and we'll get back to you shortly. | |
 |
What is Single Sign-on? |
|
How do I set up single sign-on (SSO) with RemotePC? |
|
How do I configure my RemotePC account for SSO? |
|
How do I generate the SCIM provisioning token for SSO to sync contacts from IdP? |
|
How do I enable SSO for my users? |
|
Is it possible to delete an SSO profile? |
|
How can I disable SSO for a user? |
|
Can I configure my own identity provider for SSO? |
|
Can I log in via SSO from my computers and mobile devices? |
|
How do I sign in to my SSO-enabled account from the desktop? |
Single Sign-on (SSO) is a one-step user authentication process. If you are the admin of a Team or Enterprise account, you can set up SSO with the identity providers (IdP) of your choice. Your users can access RemotePC using the IdP credentials without another password to manage.
Note: RemotePC account owners will not be able to sign in using SSO.
The administrator of a Team or Enterprise account can configure SSO to access RemotePC by signing in to a central identity provider. To set up SSO, you need to configure your identity provider and then configure your RemotePC account.
To set up SSO for your RemotePC account:
- Log in to RemotePC via a web browser.
- Click the username displayed in the top-right corner and click 'My Account'.
- Click 'Single Sign-On'.
- Enter a name for your SSO profile.
- Enter the URLs and add the X.509 certificate received from your IdP.
Note: The X.509 certificate must be in .pem or .cer format. - Click 'Configure Single Sign-On'.
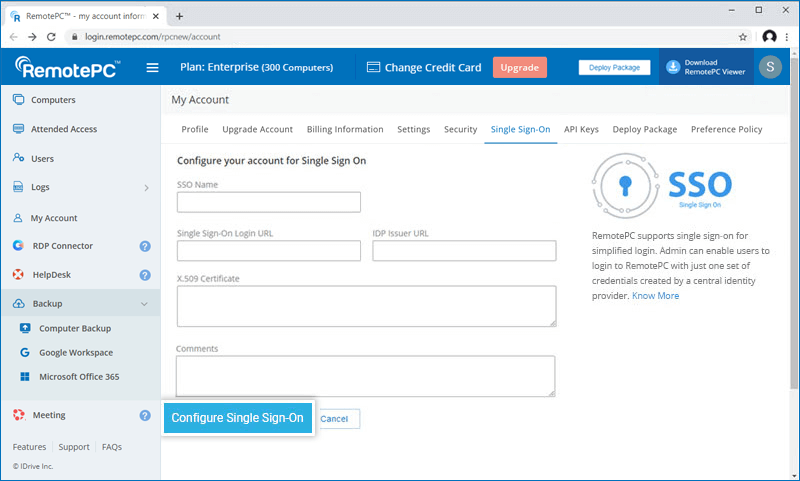
You will receive an email when SSO is enabled.
Note: The SSO configuration will be implemented only for your RemotePC account. You can manage SSO for your RDP Connector account in the My Accounts section of the RDP Connector Dashboard.
To generate a token for syncing contacts:
- Log in to RemotePC via a web browser.
- Click the username displayed in the top-right corner and click 'My Account'.
- Navigate to the 'Single Sign-On' tab and click the 'Generate Token' button under 'Sync users from your identity provider' to generate a token.
- Click the 'Copy Token' button to copy and save the token for future reference.
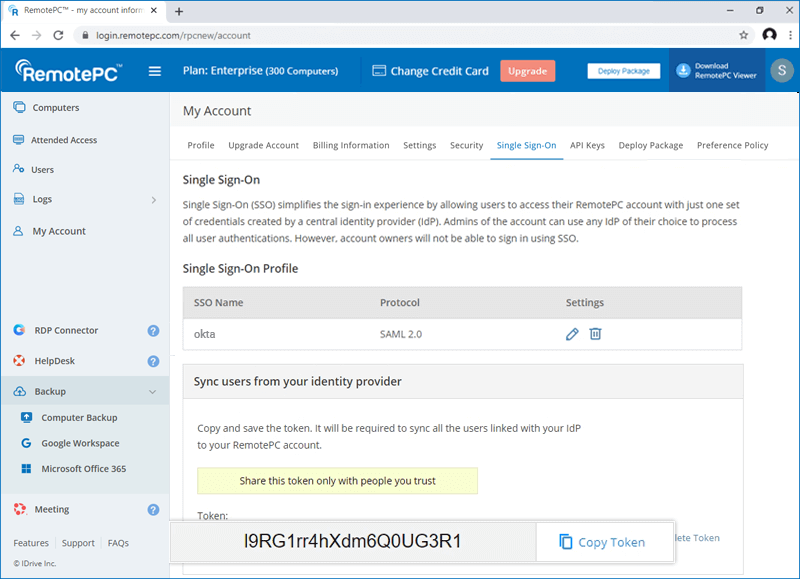
Learn how to sync contacts from Okta, OneLogin and Azure AD.
Administrators of Team or Enterprise accounts can either select SSO for login when inviting users to create an account or enable SSO for existing users.
To invite SSO users:
- Log in to RemotePC via a web browser.
- Go to the 'User Management' tab and click 'Add User'.
- Enter the user email address in the 'Email Address' field.
- Select a group and other preferences for the user.
- Select 'Enable SSO'.
Note: If you select the checkbox, users won't have to set a password for their account.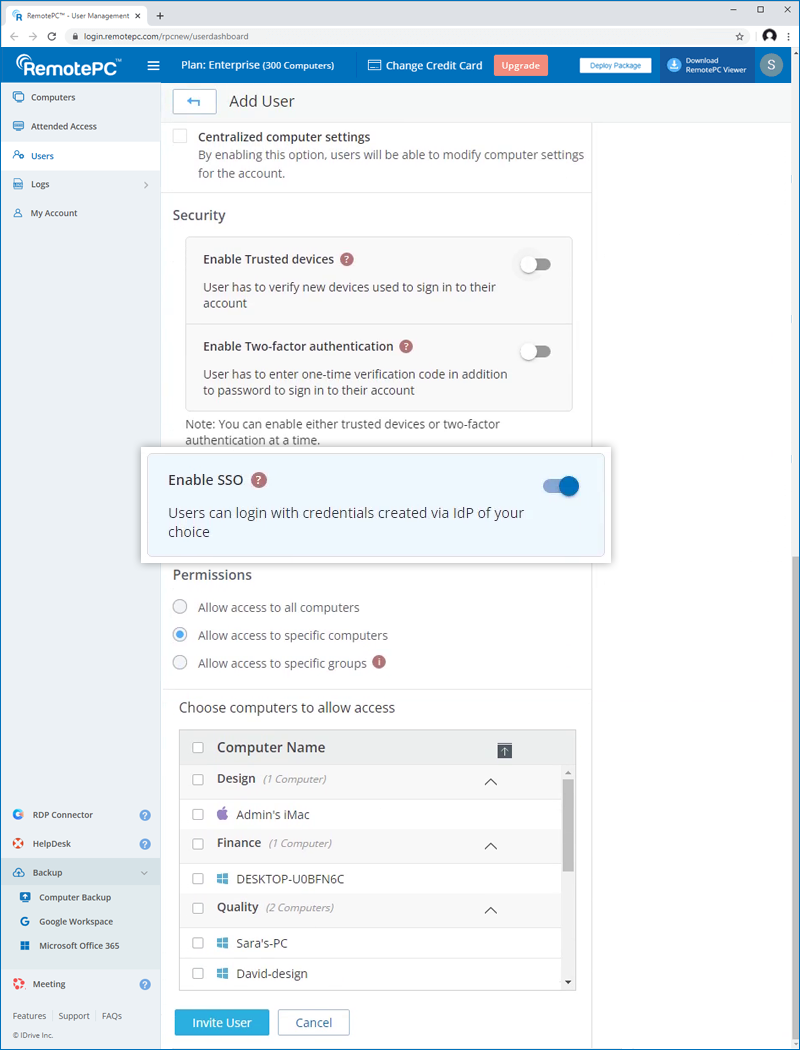
- Click 'Invite User'.
To enable SSO for existing users:
- Log in to RemotePC via a web browser and go to the 'User Management' tab.
- Hover over the user you want to edit and click
 .
. - Select 'Enable SSO'.
- Click 'Save'.
Yes, administrators can remove an SSO profile from their account.
To remove an SSO profile:
- Log in to RemotePC via a web browser.
- Click the username displayed in the top-right corner and click 'My Account'.
- Click 'Single Sign-On'.
- Click
 corresponding to the SSO profile you wish to delete.
 - Click 'Delete' in the confirmation pop-up to remove the SSO profile.
Deleting the SSO profile will remove Single Sign-On for all users linked with this profile and they will have to use their registered email and password for login.
To disable SSO for a user:
- Log in to RemotePC via a web browser and go to the 'User Management' tab.
- Hover over the user you want to edit and click .
- Deselect the 'Enable SSO' checkbox.
- Click 'Save'.
If you disable single sign-on for a user, they will need to set a new password for their account. The user must then use their email address and new password to log in.
Yes, you can configure your own identity provider for SSO along with a set of parameters as described below:
- RemotePC uses SAML2 with the HTTP Redirect binding for RemotePC to IdP and expects the HTTP Post binding for IdP to RemotePC.
- While configuring with SAML, use the following URLs and save the changes.
- Single sign on URL:
https://sso.remotepc.com/rpcnew/sso/process - Audience URL (SP Entity ID):
https://sso.remotepc.com/rpcnew/sso/metadata
- Single sign on URL:
- Your identity provider may ask if you want to sign the SAML assertion, the SAML response, or both.
All computers and mobile devices that are currently linked to RemotePC accounts will continue to work as usual. However, if users need to log in via an already configured or new device, they'll need the latest versions* of the desktop application and mobile app for single sign-on to work. If they haven't signed in to your identity provider, they'll be automatically redirected to the IdP on login.
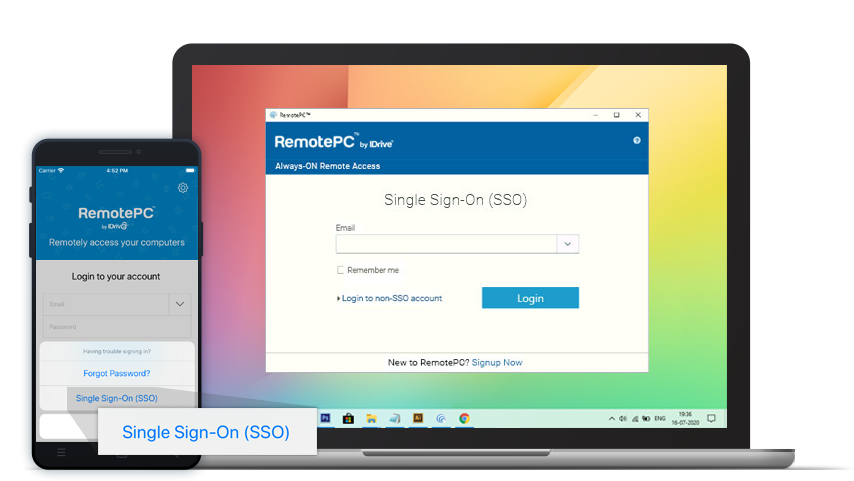
*Note: SSO is supported for the RemotePC Windows application version 7.6.31 or later, Mac application version 7.6.23 or later, iOS app version 7.6.26 or later and Android app version 4.2.3 or later.
To sign in to your SSO-enabled account via the desktop:
- Click 'Single Sign-On (SSO)' on the login screen.
- Enter your 'Email Address' and click 'Login'. You will be redirected to the IdP web sign-in page.
- Enter the username and password registered with your IdP when prompted to enter credentials.
Upon successful validation of user identity, you will be prompted to go back to the desktop application and you can now continue using your RemotePC account.