
Administrator może dodawać komputery, organizować je w grupy, przypisywać do poszczególnych użytkowników i przenosić komputery między grupami z zakładki „Komputery”.
Aby dodać komputery,
- Zaloguj się do RemotePC Dołącz przez tę stronę WWWf
- Kliknij „Dodaj komputer” i wykonaj jedną z następujących czynności:
- Aby dodać komputer, kliknij „Pobierz instalator” w zakładce „Dodaj ten komputer”.
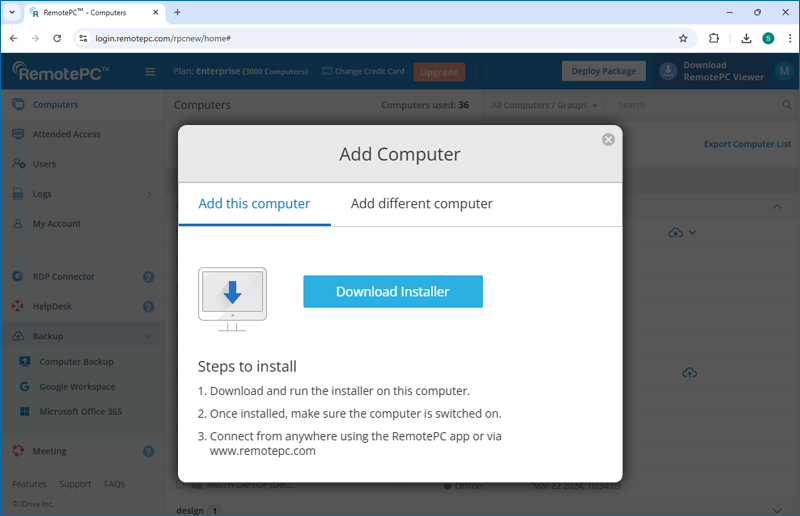
- Aby dodać różne komputery, przejdź do zakładki „Dodaj inny komputer” i udostępnij podany link użytkownikom, aby zainstalować RemotePC na innych komputerach.
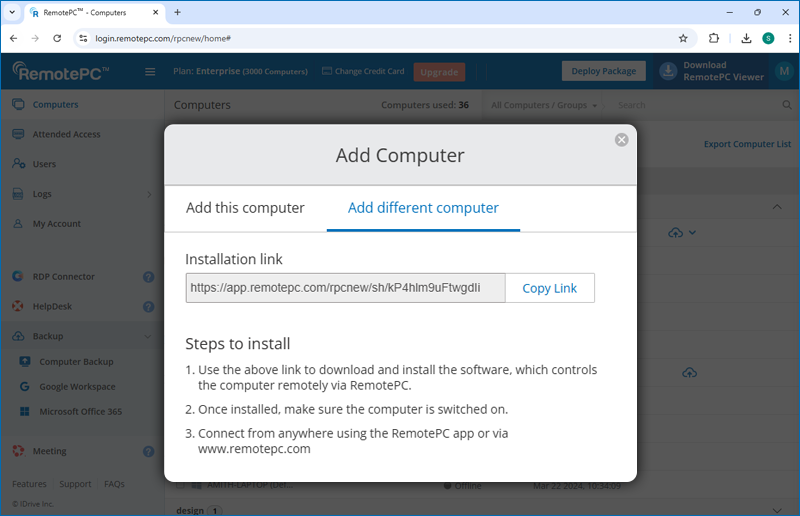
- Aby dodać komputer, kliknij „Pobierz instalator” w zakładce „Dodaj ten komputer”.
Administrator konta może usunąć wszystkie komputery z konta, jeśli jest to pożądane, ale użytkownicy mogą usunąć tylko jeden komputer.
Aby usunąć komputery,
Dla admina
- Zaloguj się do RemotePC Dołącz przez tę stronę WWWf
- Na karcie „Komputery” kliknij przycisk „Usuń komputer”.
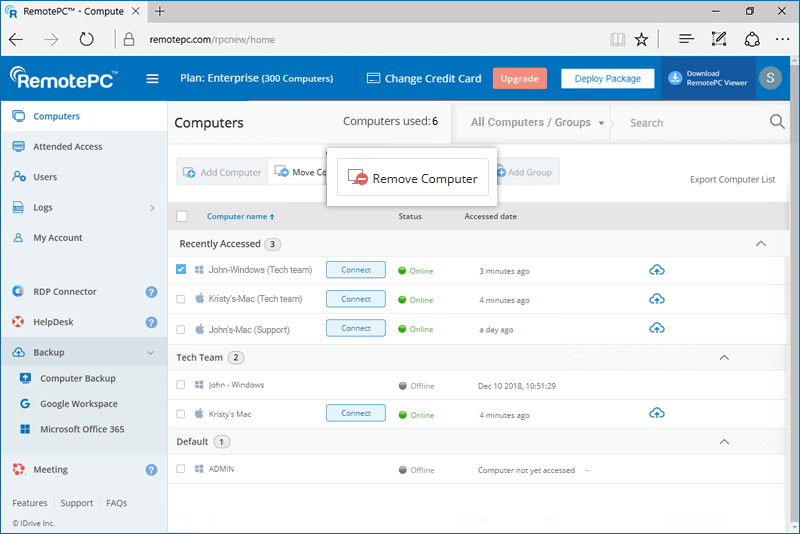
- Pojawi się wyskakujące okienko z potwierdzeniem. Kliknij „Usuń”.
- W następnym oknie możesz wyświetlić komputery wybrane przez Ciebie do usunięcia. Możesz usunąć komputery z wybranej listy.
- Kliknij „Tak”, aby usunąć komputery ze swojego konta.
Dla użytkowników:
- Zaloguj się do RemotePC Dołącz przez tę stronę WWWf
- Na karcie „Komputery” wybierz komputery, które chcesz usunąć.
- Kliknij „Usuń komputer”.
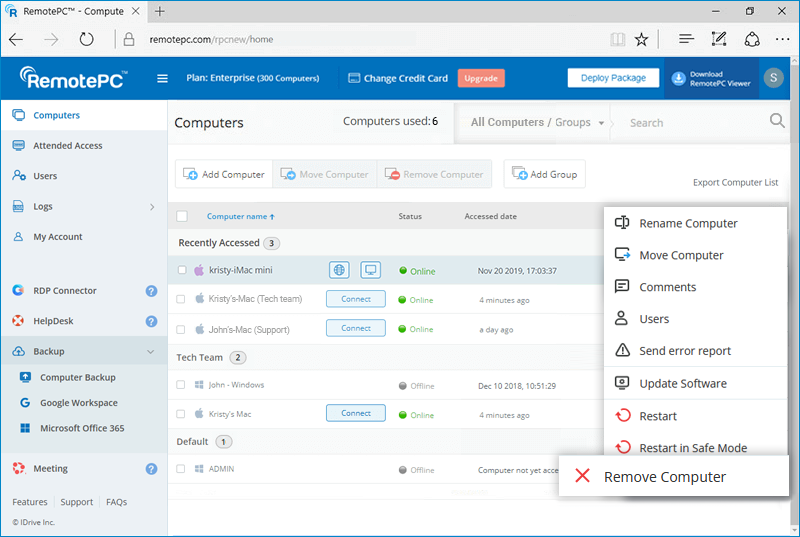
Note: Komputery, które są w sesji, nie mogą zostać usunięte.
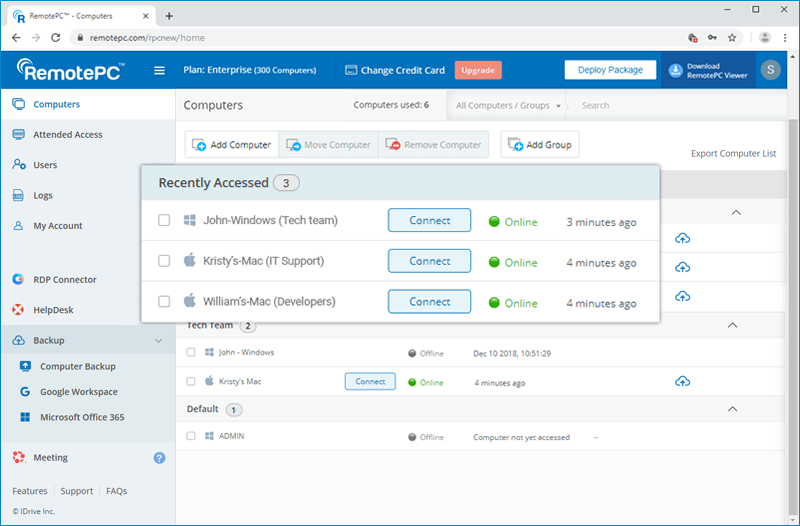
Możesz wyświetlić do 10 ostatnio używanych komputerów w sekcji „Ostatnio używane” na karcie „Komputery”. Komputery są wymienione z podaniem ich statusu, adresu IP komputera, z którego ostatnio miały dostęp, oraz daty i godziny ostatniego dostępu. W tej sekcji możesz zdalnie połączyć się z komputerem online, klikając „Połącz”.
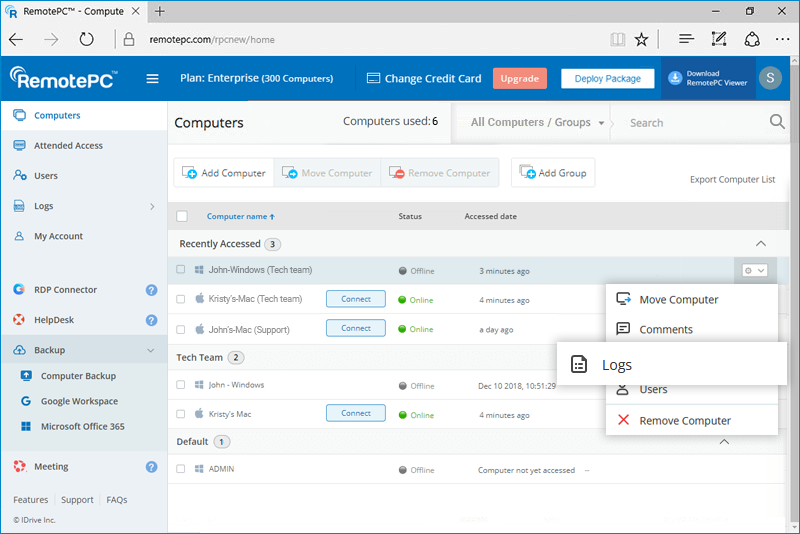
Możesz przeglądać dzienniki związane z sesją dla każdego komputera na swoim koncie.
Aby wyświetlić dzienniki sesji dla komputera,
- Zaloguj się do RemotePC za pomocą przeglądarki internetowej i przejdź do zakładki „Komputery”.
- Najedź kursorem na komputer, na którym chcesz sprawdzić dzienniki i kliknij
 .
. - Kliknij „Dzienniki”, aby wyświetlić wszystkie dzienniki sesji.
Czy mogę wdrożyć RemotePC Android Host na wielu urządzeniach w różnych lokalizacjach bez użycia danych logowania?
Tak, możesz zainstalować aplikację RemotePC Android Host na wielu urządzeniach w różnych lokalizacjach za pomocą pliku APK, bez konieczności ręcznego wprowadzania poświadczeń na każdym urządzeniu.
Udostępnij link do pobrania APK użytkownikom, aby mogli zainstalować aplikację na swoich urządzeniach.
Aby zainstalować aplikację RemotePC Host za pomocą pliku APK,
- Zaloguj się na swoje konto RemotePC Enterprise za pomocą przeglądarki internetowej.
- Kliknij
 i przejdź do „Pobierz pakiet”.
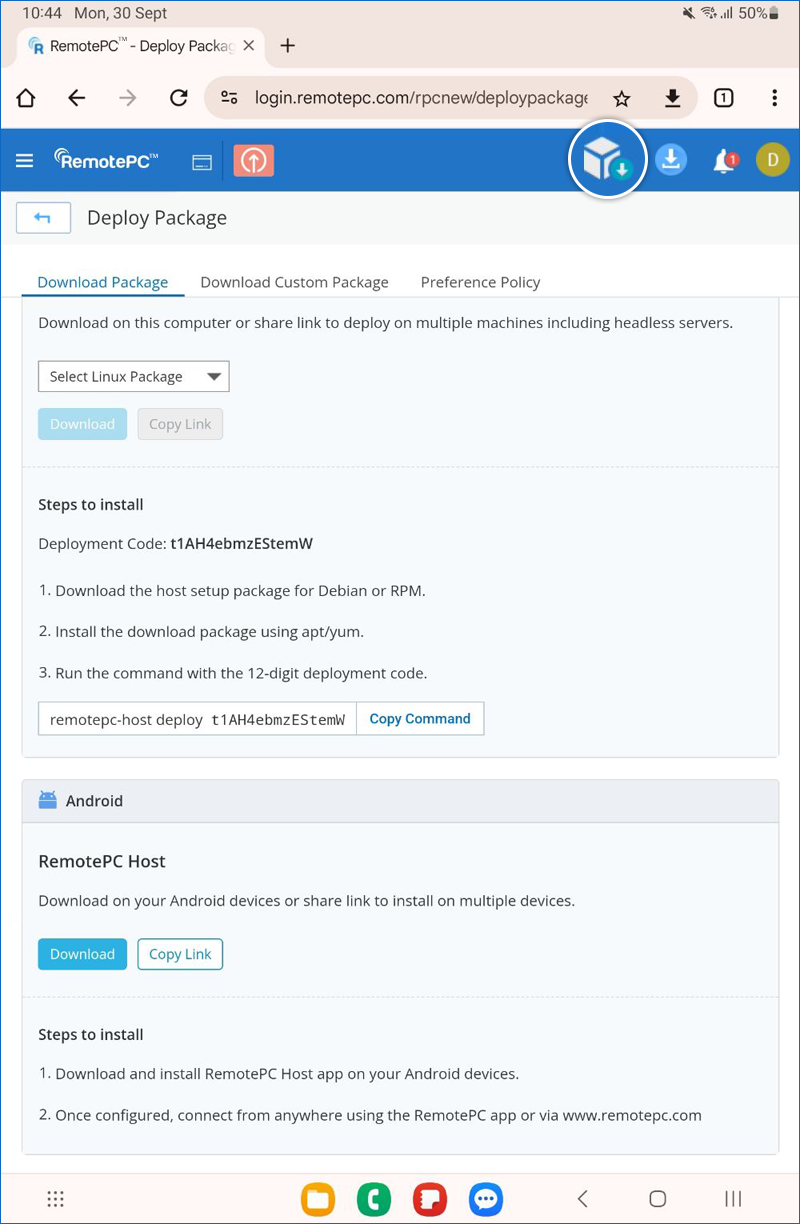
- W sekcji „Android”:
- Kliknij „Pobierz”, aby zainstalować plik APK na urządzeniu z Androidem.
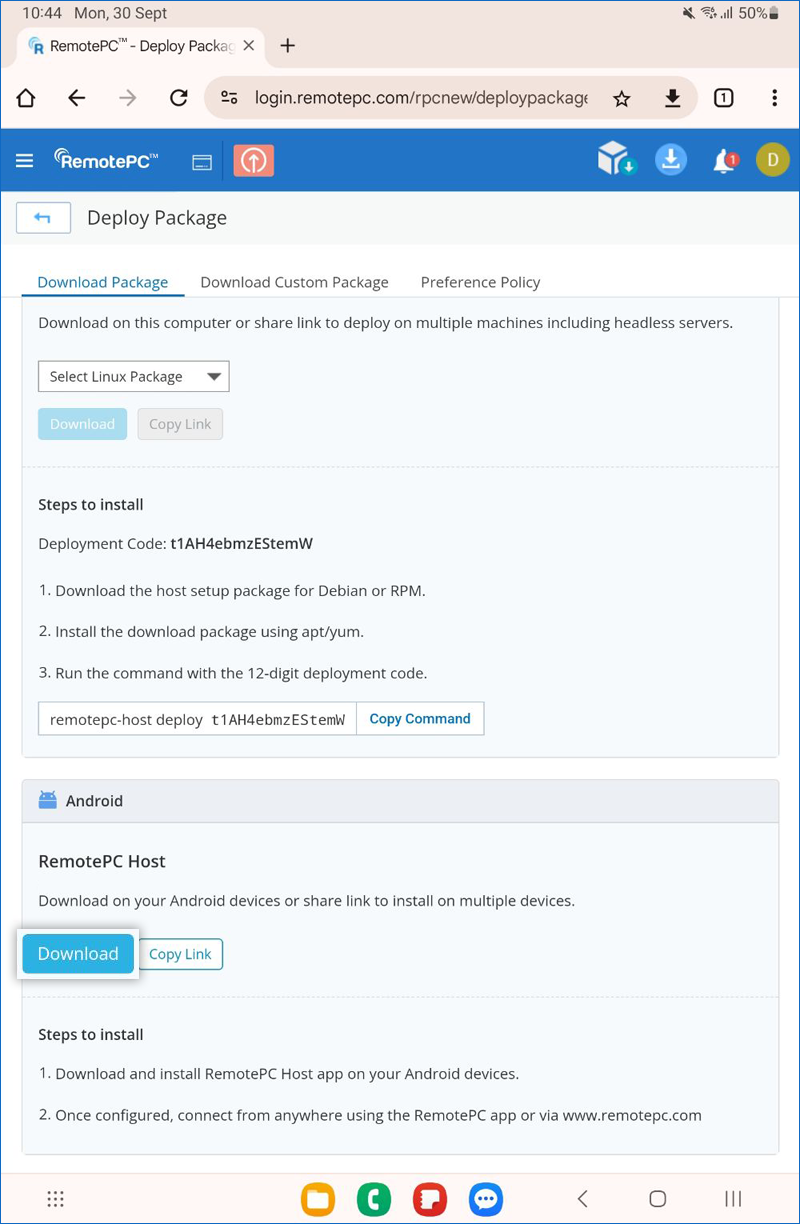
- Kliknij „Kopiuj link”, aby udostępnić link do pobierania użytkownikom. Odbiorcy mogą następnie użyć linku, aby zainstalować aplikację na dowolnym urządzeniu z Androidem.
- Kliknij „Pobierz”, aby zainstalować plik APK na urządzeniu z Androidem.
- Po zainstalowaniu aplikacji kliknij „Otwórz”. Aplikacja RemotePC uruchomi się i automatycznie zaloguje użytkowników na Twoje konto korporacyjne, bez konieczności ręcznego wprowadzania poświadczeń.
Note:
- Podczas pierwszej instalacji pojawi się komunikat o błędzie, jeśli aplikacja hosta RemotePC jest już zainstalowana na Twoim urządzeniu.
Aby rozwiązać ten problem, zainstaluj ponownie aplikację RemotePC Host lub pobierz link ponownie i otwórz aplikację. - Aby zainstalować plik APK pobrany ze strony internetowej RemotePC, musisz włączyć opcję „Zainstaluj nieznane aplikacje” na swoim urządzeniu z Androidem.
Tak, jeśli najnowsze oprogramowanie RemotePC nie jest zainstalowane w systemach Windows i Mac, można zdalnie zaktualizować oprogramowanie.
Aby zdalnie zaktualizować oprogramowanie RemotePC,
- Zaloguj się do RemotePC za pomocą przeglądarki internetowej i przejdź do zakładki „Komputery”.
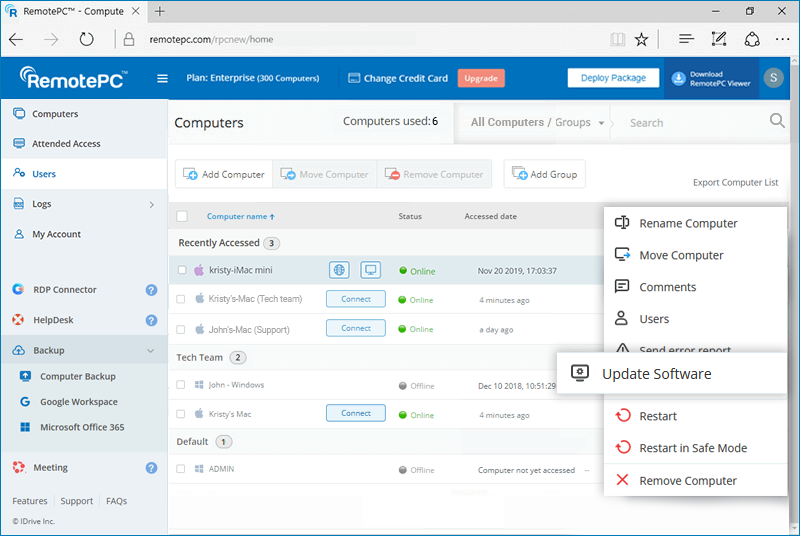
- Najedź kursorem na PC lub Mac, aby zaktualizować oprogramowanie i kliknij .
- Kliknij „Aktualizuj oprogramowanie”.
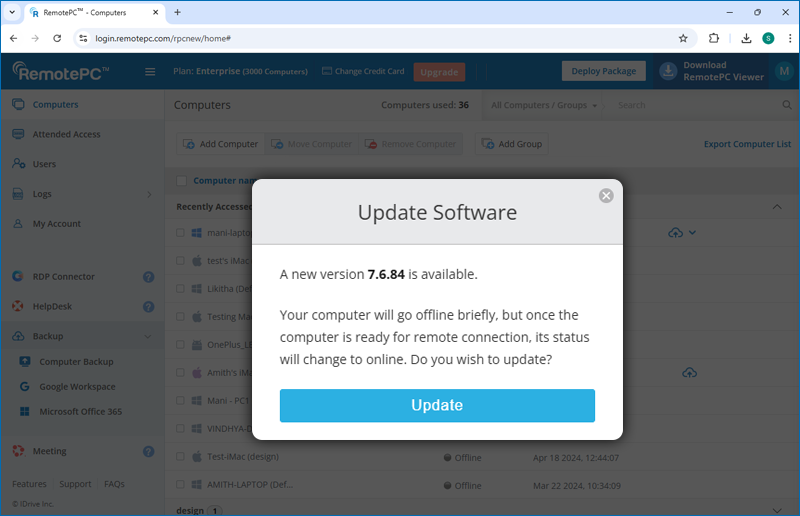
- W wyskakującym okienku kliknij „Aktualizuj”, aby kontynuować. Komputer na chwilę przejdzie w tryb offline i powróci do trybu online po zakończeniu aktualizacji.
Tak, jako administrator konta Enterprise możesz dodawać użytkowników do swojego konta, przyznawać im prawa administratora i uprawnienia do wdrażania.
Aby dodać użytkowników,
- Zaloguj się do RemotePC Dołącz przez tę stronę WWWf
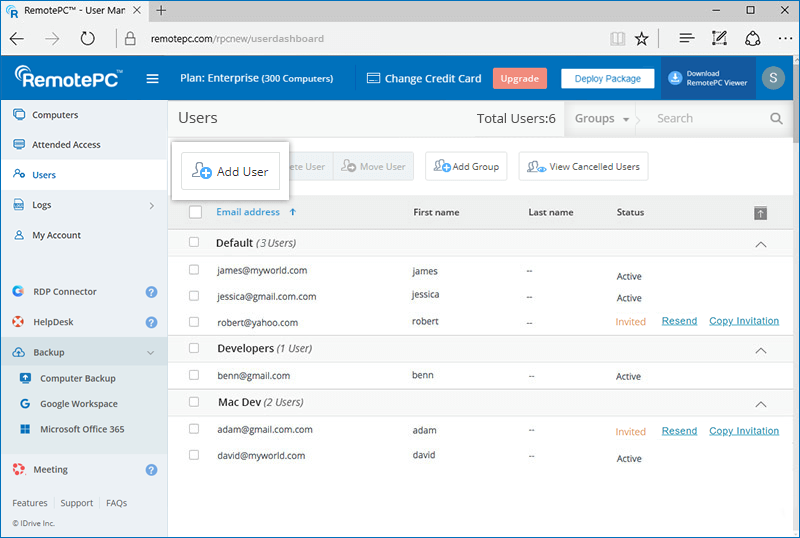
- Przejdź do karty „Zarządzanie użytkownikami” i kliknij „Dodaj użytkownika”.
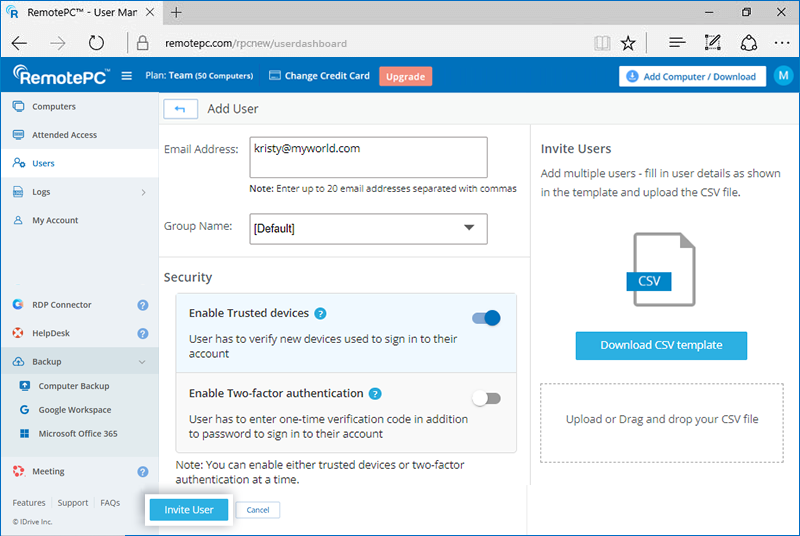
- Wprowadź adres e-mail użytkownika w polu „Adres e-mail”.
- Wybierz grupę z listy rozwijanej „Nazwa grupy”, aby dodać użytkowników do danej grupy.
- Wybierz spośród następujących preferencji:
Preferencje administratora
- Ustaw jako administratora - Przyznaj użytkownikowi uprawnienia administratora i wybierz spośród następujących preferencji administratora:
- Usuń komputer - Nadanie użytkownikom uprawnień do usuwania komputerów z konta.
- Ustawienia logowania jednokrotnego - Umożliwienie użytkownikom konfiguracji logowania jednokrotnego dla konta.
- Scentralizowane ustawienia komputera - Nadanie użytkownikom uprawnień do modyfikowania ustawień komputera dla konta.
- Zezwalaj na wdrożenie - Umożliwić użytkownikom zainstalowanie aplikacji RemotePC na swoim komputerze.
Uprawnienia
- Zezwól na dostęp do wszystkich komputerów - Nadanie użytkownikom uprawnień dostępu do wszystkich komputerów.
- Allow access to specific computers - To give users the permission to access only the selected computers.
- Allow access to specific groups - To give users the permission to access only the selected groups.
Note: Users with group access will not be allowed to deploy RemotePC software on other computers.
- Ustaw jako administratora - Przyznaj użytkownikowi uprawnienia administratora i wybierz spośród następujących preferencji administratora:
- Click 'Invite User'.
The invited user will get an email with the link to register to RemotePC. Once the user registers, their account will be added to your account.
Yes, you can add multiple users to your RemotePC account at a time by uploading a CSV file.
To invite users,
- Zaloguj się do RemotePC Dołącz przez tę stronę WWWf
- Przejdź do karty „Zarządzanie użytkownikami” i kliknij „Dodaj użytkownika”.
- Click the 'Download CSV template'.
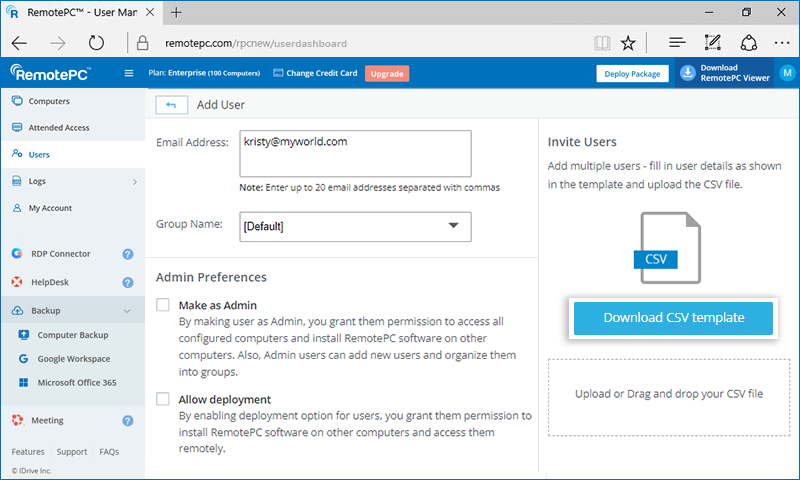
- Open the file, delete the sample entry and add the information for your users in any of the following formats (one line per user):
"EmailAddress,GroupName,AdminPreferences,2FA,SSO"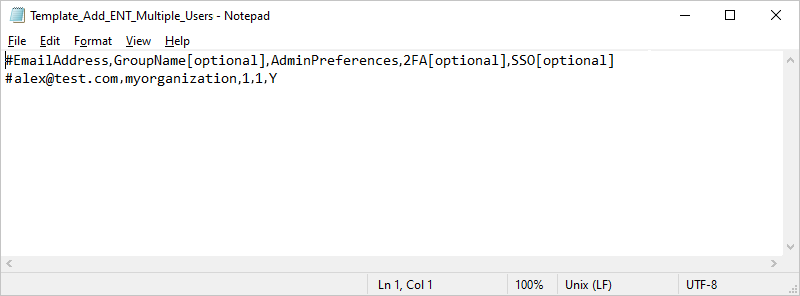
"EmailAddress;GroupName;AdminPreferences;2FA;SSO"
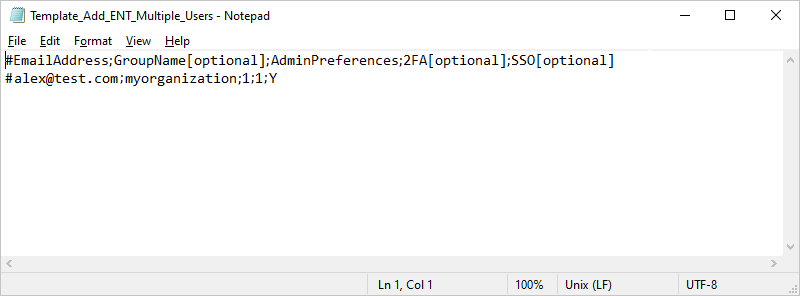
- Save the modified file.
- Drag and drop your saved CSV file onto the 'Upload or Drag and drop your CSV file' area. Alternatively, click the area to browse for your CSV file and upload.
- In the popup that appears, click 'Add Users'.
- A confirmation message appears after adding the users.
Note: You can add up to 500 users at a time using the CSV file.The invited users will get an email with the link to register to RemotePC. Once the users register, their account will be added to your account.
Czy jako administrator mogę przypisać lub anulować przypisanie określonych komputerów do moich użytkowników?
Yes, as an Admin you can assign or unassign computers to users.
To assign/unassign computers,
- Zaloguj się do RemotePC via web browser and go to the 'User Management' tab.
- Hover on the user you wish to edit and click
 .
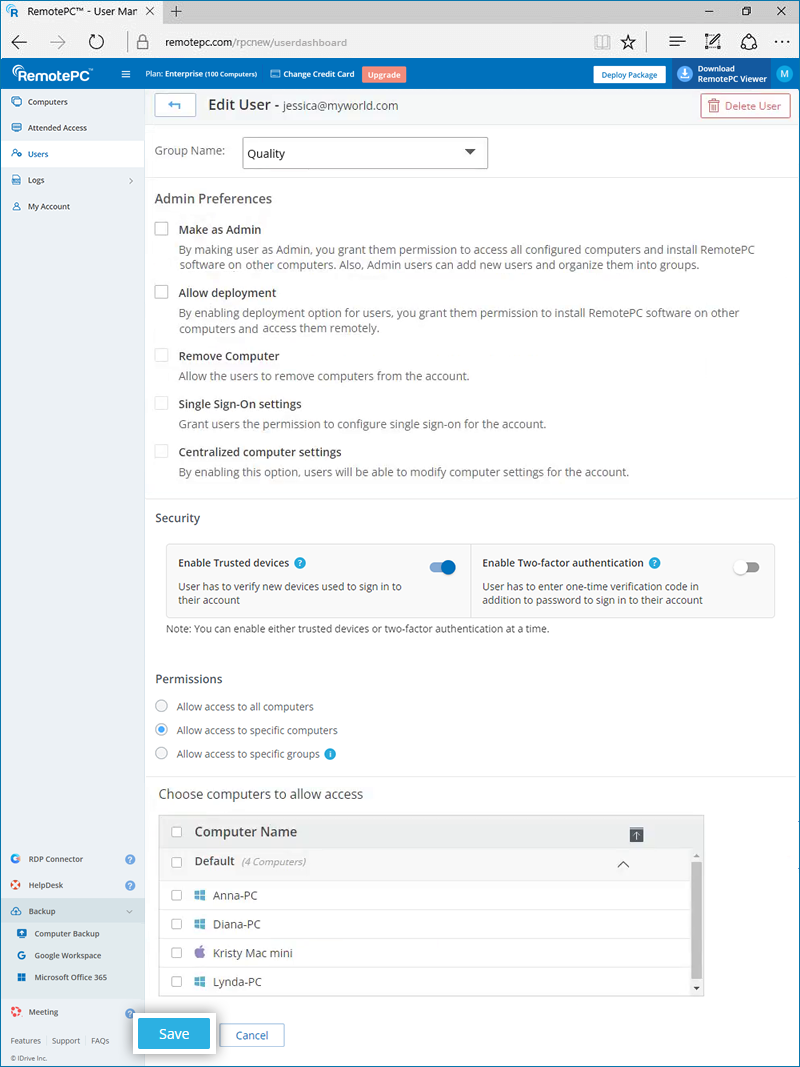
. - Select the 'Allow access to specific computers' radio button from the 'Permissions' section.
- Select the computers you want to assign, or deselect the computers you wish to unassign from the 'Computer Name' section and click 'Save'.
Alternatively,
- Go to the 'Computers' tab.
- Hover on the computer you wish to edit and click .
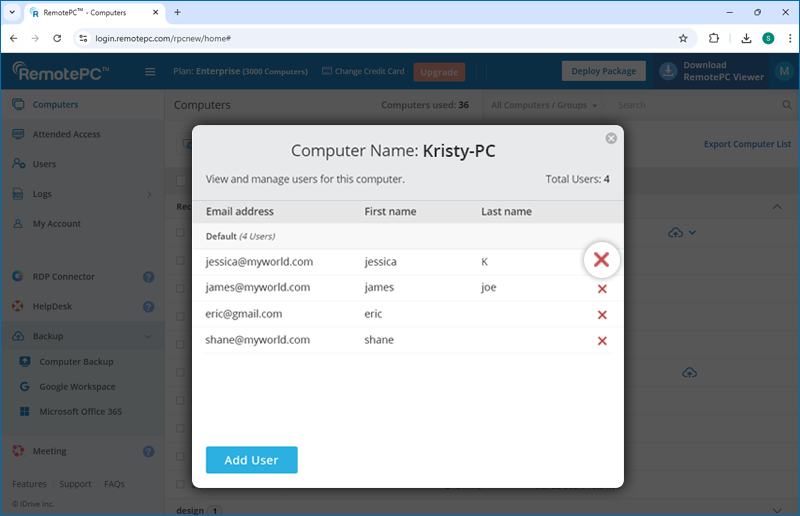
- Click 'Users'. A popup, with a list of users assigned to the computer, will appear.
- Click 'Add Users'. The list of users who have not been assigned the computer will appear.
- Select the users you wish to assign and click 'Add'.
- To unassign users, click
 against the usernames you wish to unassign.
Yes, as an Admin you can edit user permissions.
To edit,
- Zaloguj się do RemotePC via web browser and go to the 'User Management' tab.
- Hover on the user you want to edit and click
 .
. 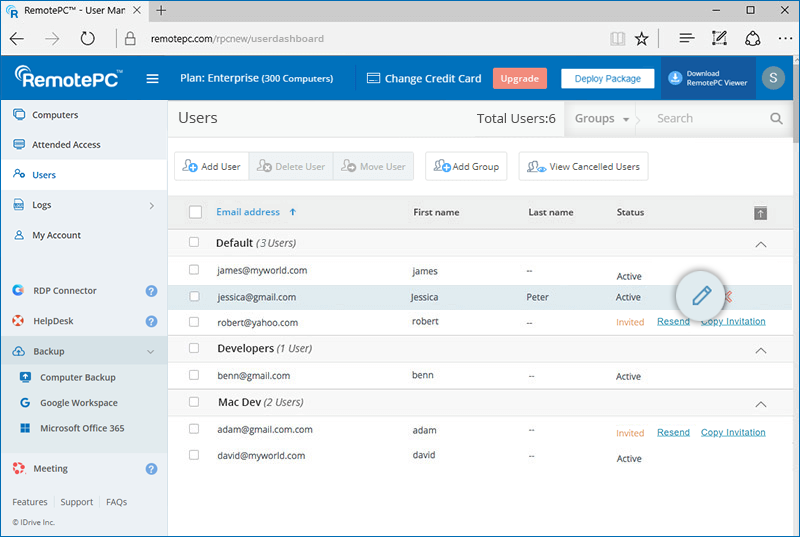
- Make the required changes in the 'Preferences' and 'Permissions' section.
- Click 'Save'.
To reset / remove the Personal Key,
- Launch the RemotePC desktop application on the computer you wish to reset the Personal Key.
- Log in to your account.
- Right-click the computer name, and click 'Edit/Remove Personal Key'.
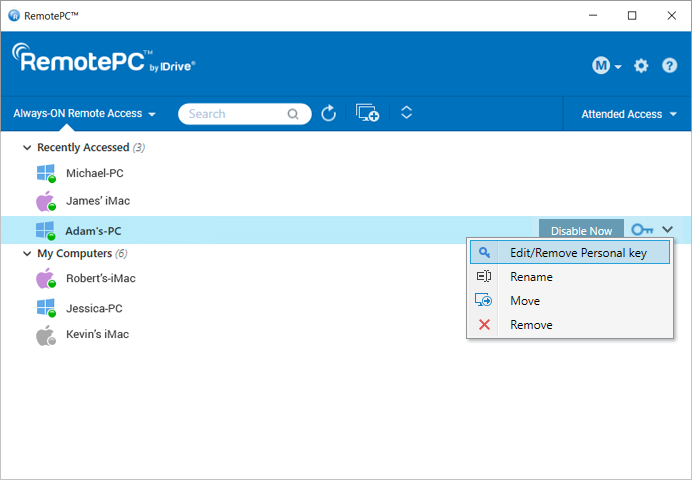
- Enter the new Personal Key and confirm the same. Click 'Change'.
- If you wish to connect to the computer without a Personal Key, click 'Remove Key'.
To delete users,
- Zaloguj się do RemotePC via web browser and go to the 'User Management' tab.
- To delete a single user, hover on the user you want to delete and click
 .
. - To delete multiple users from the list, select the users and click 'Delete User'.
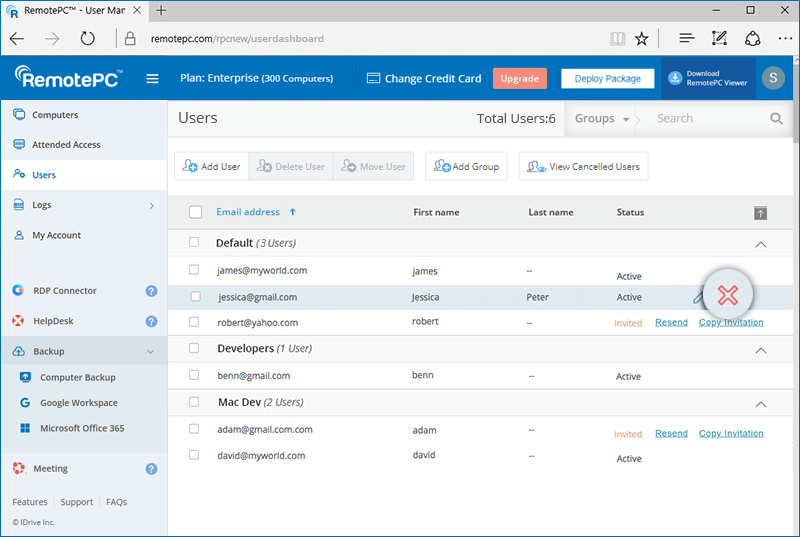
- Click 'Yes' in the confirmation window.
You can send the API requests using the API Key generated for your account in the web console.
Read API documentationTo get the API key,
- Log in to your RemotePC Enterprise account.
- Go to 'My Account' tab and click 'API Keys'.
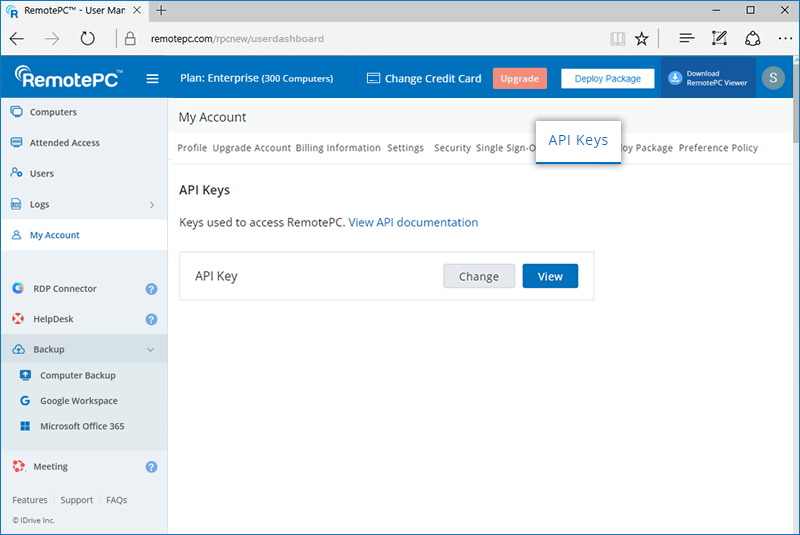
- Click 'View', enter the account password, and click 'View'.
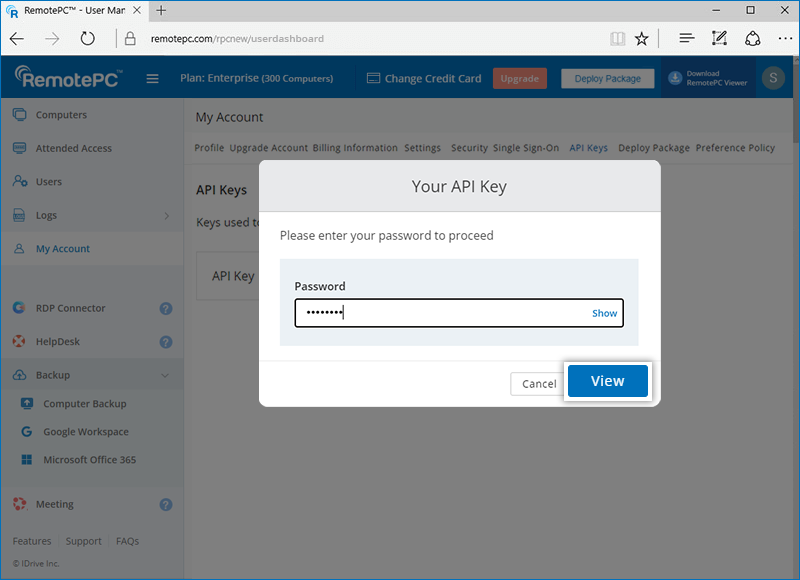
- The API Key will be displayed. Click 'Copy Key' to copy to the clipboard.
To change the API Key, click 'Change'. Enter the account password and click 'View' to view the new API key.
Note: Only the Admin (account owner) can generate the API Key.
Jak mogę ustawić ekran hosta na wyłączanie i blokowanie wprowadzania danych podczas sesji zdalnej oraz automatyczną blokadę po zakończeniu sesji?
In order to apply these viewer menu options to the users by default, you need to create a 'Preference Policy' and apply it to the target computers. Within the policy, enable the preferred security settings to ensure enhanced privacy and control during remote sessions.
To learn how to create a Preference Policy, refer to this FAQ.
Note: For Team and SOHO accounts, viewer menu options selected during a remote session are automatically saved and will be applied in subsequent sessions.
A group is a collection of users/computers organized together by the Admin. One user cannot be added to more than one group.
To create a computer group,
- Zaloguj się do RemotePC Dołącz przez tę stronę WWWf
- Click 'Add Group' displayed in the menu bar.
- Enter a name in the 'Group name' field.
- Click 'Add'. You can now add computers to the created group.
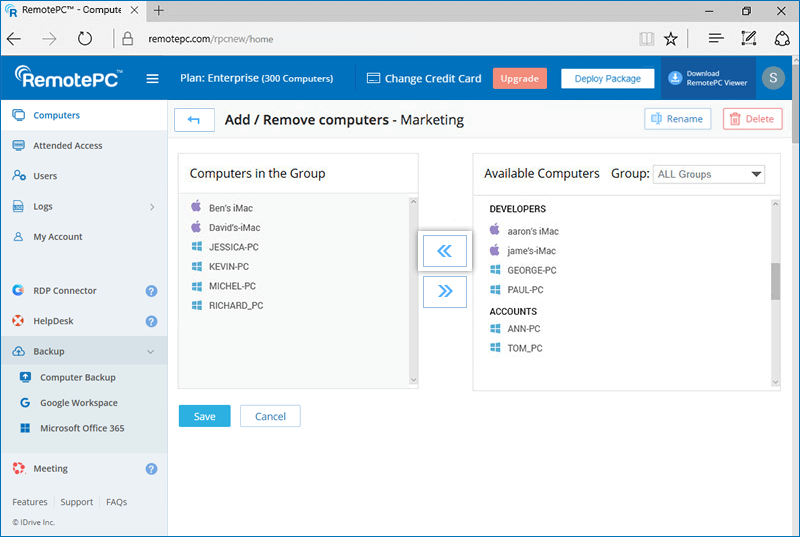
- Select the required computer(s) from the 'Available Computers' section and click
 .
. 
- Click 'Add'.
To create a user group,
- Zaloguj się do RemotePC via web browser and go to the 'User Management' tab.
- Click 'Add Group' displayed in the menu bar.
- Enter a name in the 'Group name' field.
- Click 'Add'.
Yes, you can move users between groups.
To move,
- Zaloguj się do RemotePC via web browser and go to the 'User Management' tab.
- Select the user(s) to move and click 'Move User'.
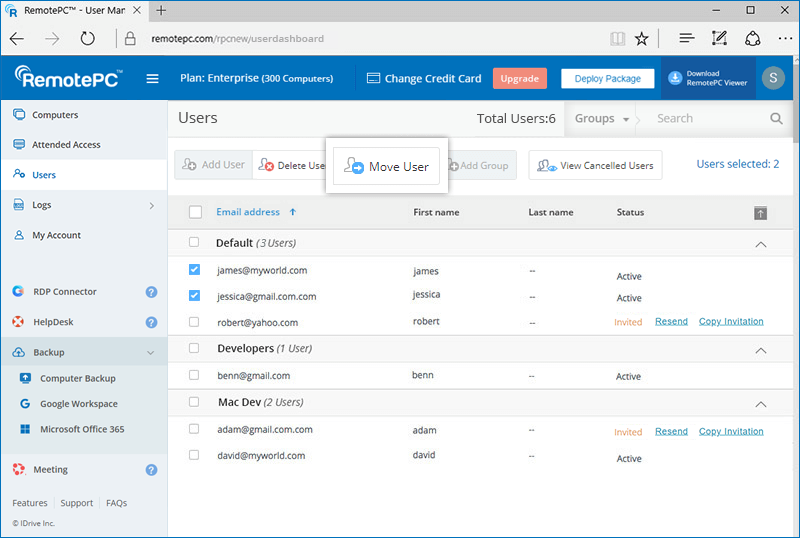
- The 'Move User' window appears. Select the required group from the 'Group name' drop-down list.
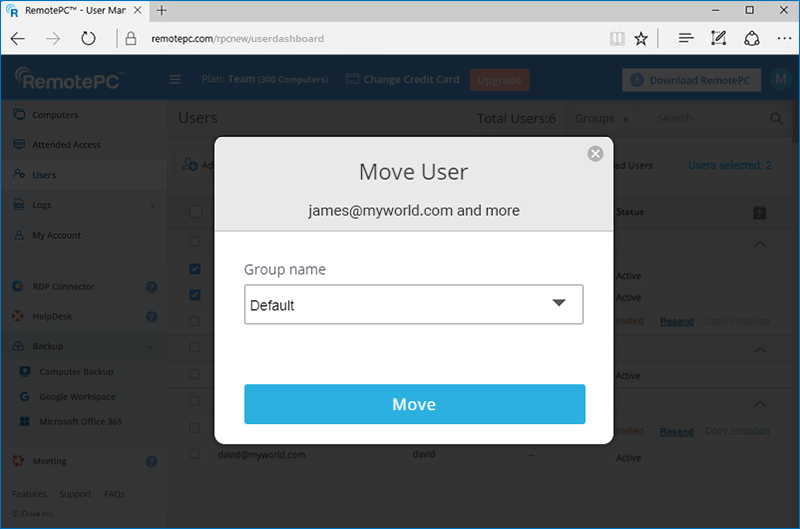
- Click 'Move'.
To delete a user group,
- Zaloguj się do RemotePC Dołącz przez tę stronę WWWf
- Go to the 'User Management' tab. The list of groups and associated users appears.
- Hover on the group you want to delete and click
 .
. - Click 'Ok' in the confirmation window.
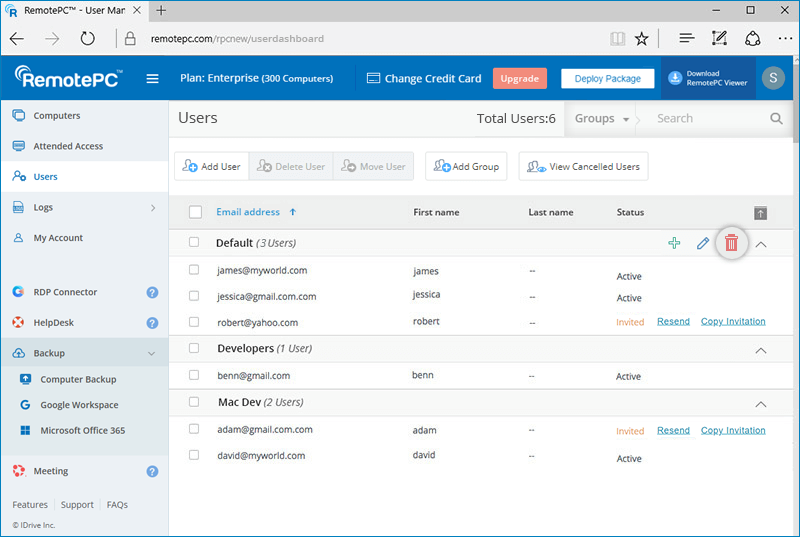
To delete a computer group,
- Zaloguj się do RemotePC via web browser. The list of groups and associated computers appears.
- Hover on the group you want to delete and click .
- The 'Add / Remove computers' page appears. Click 'Delete' displayed on the top-right corner.
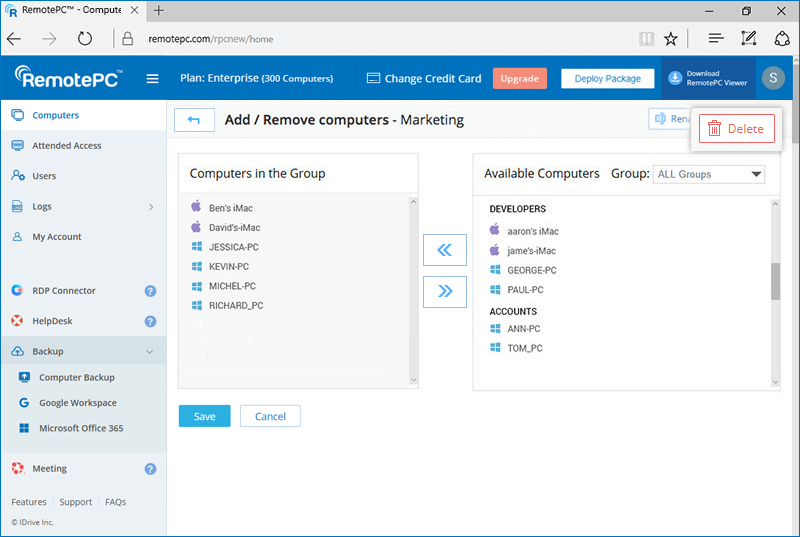
- A confirmation window appears. Click 'Ok'.
You can add computers to a group while creating it.
To add computers to an existing group,
- Zaloguj się do RemotePC Dołącz przez tę stronę WWWf
- Kliknij against the group you want to add the computers to.
- Select the computers from 'Available Computers' section and click to add the computers.
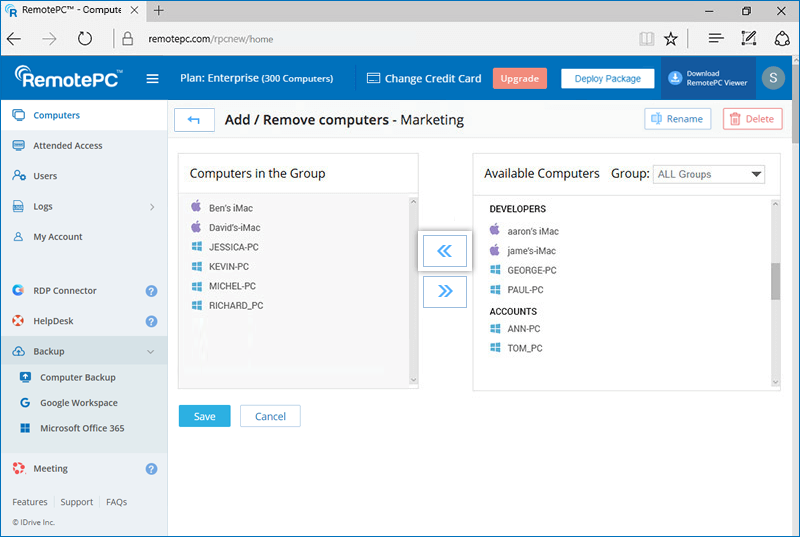
- Click 'Add'.
Yes, you can move computers between groups.
To move multiple computers,
- Zaloguj się do RemotePC Dołącz przez tę stronę WWWf
- Select the computers you want to move and click 'Move Computer'.
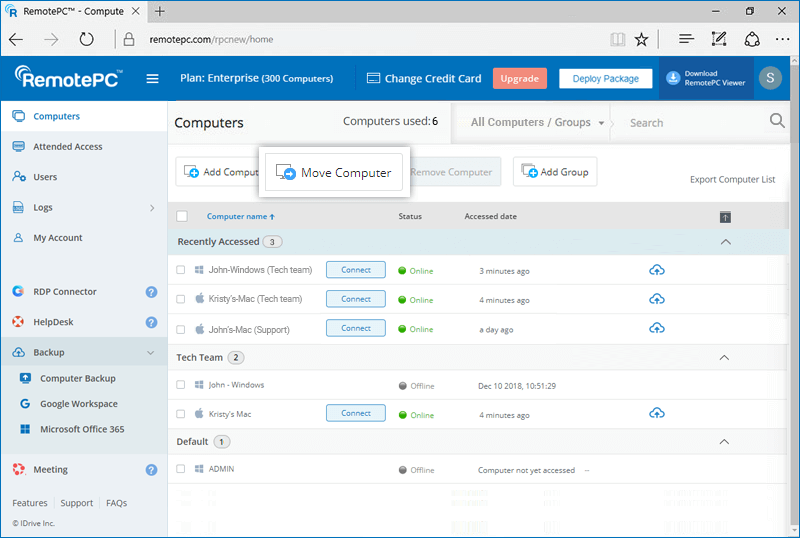
- Select the group from the 'Group name' drop-down list and click 'Move'.
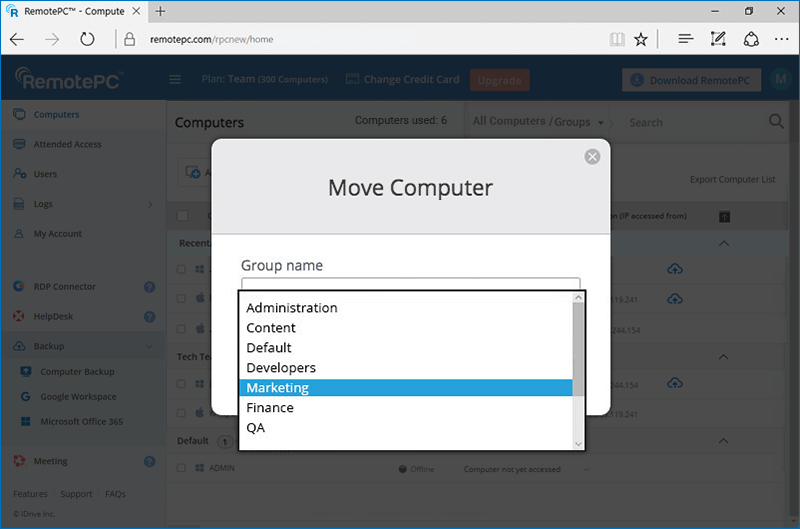
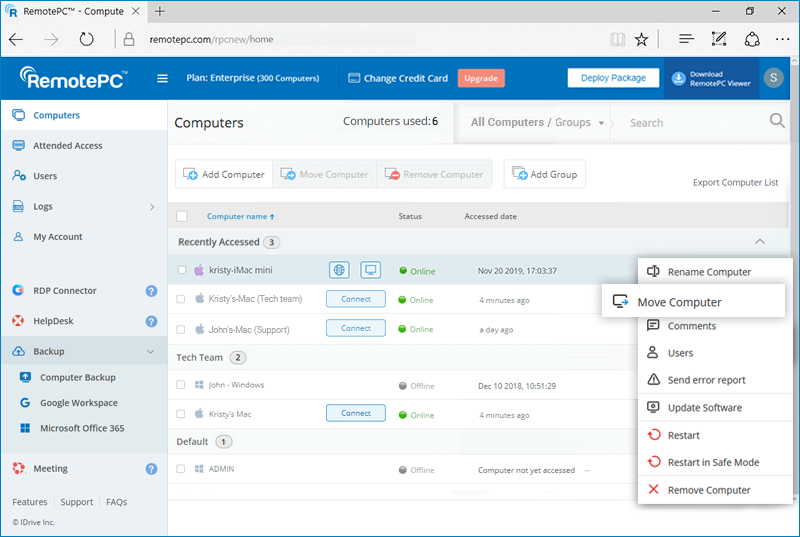
To move an individual computer,
- Kliknij corresponding to the computer and click 'Move Computer'.
- Select the group from the 'Group name' drop-down list and click 'Move'.
Run the following commands in the command prompt to install the RemotePC.msi file.
To install RemotePC Host,
- Launch command prompt in administrator mode.
- Ensure that the path is: C:\WINDOWS\system32>
- Execute the command:
QUERY LENGTH LIMIT EXCEEDED. MAX ALLOWED QUERY : 500 CHARS
For example:C:\WINDOWS\system32>msiexec.exe /i "C:\Users\TestUser\Desktop\RPCMSI\RemotePC.msi" /qn ID=uKjNNpkSWo1pnE8 Groupname = GRPOne PERSONALKEY =test1234 HIDETRAY =1 CONNECT_PERMISSION=3 REMOVE_WALLPAPER=1 DISABLE_AERO_THEME=1 DISABLE_FONT=1 DISABLE_SLEEP_MODE=1 HARDWARE_ACCELERATION=1 CONNECT_TO_ACTIVE_SESSION=1 SHOW_WHO_IS_Accessing =1 LOCK_ON_SESSION_END=0 LOCAL_PROXY_IP= 192.168.3.176 LOCAL_PROXY_PORT=801 LOCAL_PROXY_USERNAME=test LOCAL_PROXY_PASSWORD=test ENABLE_DISABLE_PRINTER=0 SHOW_CONFIRM=0 COMPUTERNAME="Server 2019"
Jeśli nie możesz zainstalować RemotePC, przejdź do Panelu sterowania, odinstaluj RemotePC Setup i uruchom polecenia ponownie. Alternatywnie, uruchom następujące polecenia ponownej instalacji.
Aby ponownie zainstalować / nadpisać instalację
- Launch command prompt in administrator mode.
- Ensure that the path is: C:\WINDOWS\system32>
- Execute the command:
Najnowsza wersja RemotePC MSI:QUERY LENGTH LIMIT EXCEEDED. MAX ALLOWED QUERY : 500 CHARSFor example:
C:\WINDOWS\system32>msiexec.exe /i "C:\Users\TestUser\Desktop\RPCMSI\RemotePC.msi" /qn
ID=uKjNNpkSWo1pnE8 GROUPNAME=GRPOne PERSONALKEY=test1234
HIDETRAY =1 CONNECTPERMISSION =3 REMOVE_WALLPAPER=1 DISABLE_AERO_THEME=1 DISABLE_FONT=1 DISABLE_SLEEP_MODE=1 HARDWARE_ACCELERATION=1 CONNECT_TO_ACTIVE_SESSION=1 SHOW_WHO_IS_ACCESSING=1 LOCK_ON_SESSION_END=0 LOCAL_PROXY_IP= 192.168.3.176 LOCAL_PROXY_PORT=801 LOCAL_PROXY_USERNAME=test LOCAL_PROXY_PASSWORD=test ENABLE_DISABLE_PRINTER=0 SHOW_CONFIRM=1 REINSTALMODE ="aecmus" REINSTALL="ALL" COMPUTERNAME="Serwer 2019"
Note:
- Dodatek /qn do cichej instalacji.
- Jeśli SHOW_CONFIRM=1, okno zgody zostanie wyświetlone podczas konfiguracji, nawet w instalacji cichej.
- NAZWA komputera powinna zawierać od 1 do 50 znaków.
- Nazwy grup nie mogą zawierać więcej niż 20 znaków.
- Jeśli znaki specjalne są nieprawidłowe, urządzenie zostanie przeniesione do grupy „Domyślne”.
- Jeśli nazwa grupy nie istnieje, zostanie utworzona nowa grupa o podanej nazwie i zostanie do niej przypisany komputer.
Podczas instalacji można wstępnie zdefiniować opcjonalne parametry komputera zdalnego.
parametry Opis ID Parametr obowiązkowy. Dostępny pod Wdróż pakiet > Wdrożenie grupy za pośrednictwem MSI > ID Konfiguracji: na Twoim koncie RemotePC PERSONALKEY Ustaw „Klucz osobisty”, który działa jako hasło dodatkowe, dla komputera zdalnego Nazwagrupy Nazwa grupy, do której zostanie przypisany komputer * NAZWA KOMPUTERA Nazwa maszyny przypisanej do hosta DEMONTAŻ Odinstaluj host RemotePC za pomocą polecenia MSI DEINSTALUJ=tak
Note: Nie łącz tego z innymi parametramiHIDETRAY 1 Włączenie tej opcji uniemożliwi użytkownikom dostęp do opcji tacki na ich komputerach zdalnych 0 Odkryj tacę i zezwól użytkownikom na dostęp do jej opcji CONNECT_PERMISSION 0 Uprawnienie do żądania połączenia jest wyłączone 1 Automatycznie odrzuć połączenie na ekranie logowania po wygaśnięciu prośby 2 Automatycznie zezwalaj na połączenie na ekranie logowania po wygaśnięciu żądania 3 Zezwól na połączenie po wygaśnięciu żądania USUŃ_TAPETĘ 1 Włączenie tej opcji spowoduje usunięcie tapety podczas sesji zdalnej 0 Tapeta jest wyświetlana podczas sesji zdalnej DISABLE_AERO_THEME 1 Wyłącz motyw aerodynamiczny podczas sesji zdalnej 0 Motyw Aero pozostaje aktywny podczas sesji zdalnej Wyłącz czcionkę 1 Wygładzanie czcionek jest wyłączone podczas sesji zdalnej 0 Wygładzanie czcionek jest włączone DISABLE_SLEEP_MODE 1 Wyłącz tryb uśpienia, gdy host jest skonfigurowany 0 Jeśli ta opcja jest wyłączona, zdalny komputer przejdzie w tryb uśpienia po określonym czasie. Przyspieszenie sprzętowe 1 Użyj przyspieszenia sprzętowego podczas sesji zdalnej 0 Przyspieszenie sprzętowe jest wyłączone CONNECT_TO_ACTIVE_SESSION 1 Włączenie tej opcji umożliwi użytkownikom łączenie się z aktywnymi sesjami RDP na hostach Windows 0 Połączenie z aktywną sesją jest wyłączone POKAŻ_KTO_UZYSKUJE_DOSTĘP 1 Pokaż powiadomienie o tym, kto uzyskuje dostęp podczas sesji zdalnej 0 Ukryj powiadomienie dla tego, kto uzyskuje dostęp podczas sesji zdalnej LOCK_ON_SESSION_END 1 System zablokuje się po zakończeniu sesji 0 System nie zablokuje się po zakończeniu sesji LOCAL_PROXY Użytkownicy mogą przekazywać lokalne szczegóły serwera proxy jako parametry LOCAL_PROXY_IP = 192.168.3.176 LOCAL_PROXY_PORT = 801 LOCAL_PROXY_USERNAME = test LOCAL_PROXY_PASSWORD = test WŁĄCZ DRUKARKĘ 1 Zdalne drukowanie zostanie włączone 0 Zdalne drukowanie zostanie wyłączone POKAŻ_POTWIERDŹ 0 Nie wyświetlaj okna zgody; skonfiguruj host automatycznie. 1 Wyświetl okno zgody na hoście; Potwierdź – Machine jest online; Odrzuć – Machine pozostaje offline.
*Note:
- NAZWA komputera powinna zawierać od 1 do 50 znaków.
- W przypadku, gdy nazwa grupy nie istnieje, zostanie utworzona nowa grupa o podanej nazwie i zostanie do niej przypisany komputer.
- Jeśli komputer już istnieje w jakiejkolwiek innej grupie, zostanie przeniesiony do nowej grupy określonej przez użytkownika.
Uruchom następujące polecenia w wierszu polecenia, aby zainstalować plik RemotePCViewer.msi.
Aby zainstalować przeglądarkę RemotePC,
- Launch command prompt in administrator mode.
- Upewnij się, że ścieżka jest: C:\WINDOWS\system32>
- Execute the command:
msiexec.exe /i <ZX2QZZViewer.msi ścieżka > /qn PRODUCTNAME=przeglądarka
For example:
msiexec.exe /i "C:\Users\Test\Desktop\MSI\UN\RemotePCViewer.msi" /qn PRODUCTNAME=viewer
Aby odinstalować przeglądarkę RemotePC,
- Launch command prompt in administrator mode.
- Ensure that the path is: C:\WINDOWS\system32>
- Odinstaluj RemotePC Viewer za pomocą polecenia:
msiexec.exe /i <ZX2QZZViewer.msi ścieżka> /qn PRODUCTNAME= DEINSTALACJA przeglądarki =tak
For example:
msiexec.exe /i "C:\Users\Test\Desktop\MSI\UN\RemotePCViewer.msi" /qn PRODUCTNAME= DEINSTALACJA przeglądarki =tak
Podczas instalacji można wstępnie zdefiniować opcjonalne parametry komputera zdalnego.
parametry Opis NAZWA PRODUKTU Nazwa produktu musi być podana jako „przeglądarka” , aby zainstalować aplikację RemotePC Viewer. DEMONTAŻ Dołącz ten parametr wraz z PRODUCTNAME= viewer, aby odinstalować przeglądarkę RemotePC za pomocą polecenia MSI UNINSTALL=yes Aby odinstalować host RemotePC za pomocą MSI,
- Launch command prompt in administrator mode.
- Ensure that the path is: C:\WINDOWS\system32>
- Odinstaluj host RemotePC za pomocą polecenia:
msiexec.exe /i <RemotePC.msi ścieżka> /qn DEINSTALACJA=tak
Przykładowo:
msiexec.exe /i "C:\Users\Test\Desktop\MSI\UN\RemotePC.msi" /qn UNINSTALL=yes
Aby utworzyć politykę preferencji,
- Zaloguj się na swoje konto.
- Kliknij Wdróż pakiet w prawym górnym rogu.
- Wejdź na Polityka preferencji Następnie kliknij przycisk Utwórz zasady.
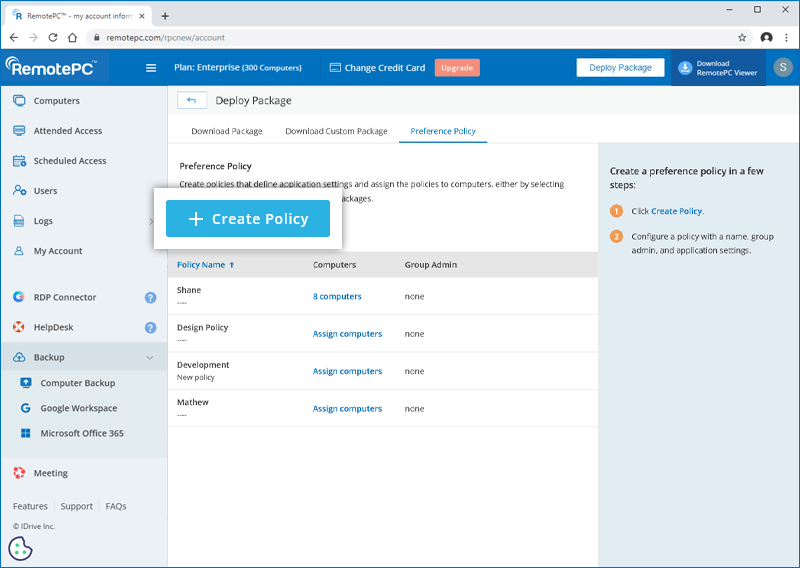
- Wprowadź nazwę i opis zasady.
- Wybierz administratora dla grupy (opcjonalnie).
- Skonfiguruj ustawienia w sekcjach Ogólne, Bezpieczeństwo i Kontrola zgodności. Ustawienia zdefiniowane przez administratora są automatycznie stosowane do wszystkich komputerów przypisanych do polisy.
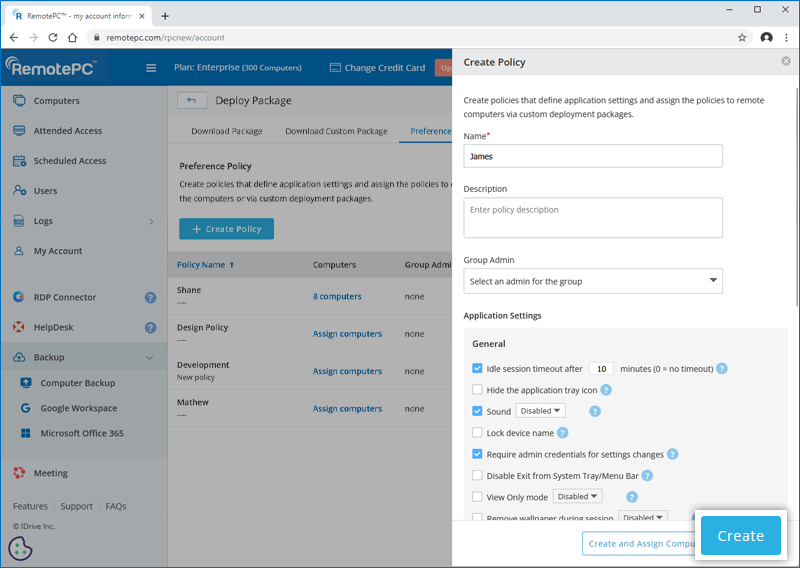
- Limit czasu sesji bezczynności po (X) minutach (0 = brak limitu czasu)
Określ limit czasu bezczynności, aby automatycznie zakończyć zdalną sesję po bezczynności. - Ukryj ikonę w tacce aplikacji
Wybierz tę opcję, aby ukryć ikonę aplikacji w tacce systemowej. - Dźwięk
Wybierz „Włączony”, aby odsłuchać zdalne wyjście audio podczas sesji. - Nazwa urządzenia
Włącz, aby zapobiec zmianom nazwy urządzenia. - Wymagaj poświadczeń administratora do zmian ustawień
Włącz, aby wymagać uwierzytelnienia administratora do modyfikowania ustawień. - Wyłącz wyjście z tacki systemowej/paska menu
Włącz, aby uniemożliwić użytkownikom wyjście z aplikacji z tacki/paska menu. - Tryb tylko do podglądu
Wybierz „Włączone”, aby ograniczyć sesję tylko do przeglądania, bez sterowania myszą i klawiaturą. - Usuń tapetę podczas sesji
Wybierz „Włączone”, aby usunąć tapetę pulpitu podczas sesji, aby poprawić wydajność. - Zsynchronizuj nazwę urządzenia z systemem operacyjnym
Enable to automatically set the RemotePC device name to match the computer's operating system hostname. - Ask remote access permission every time
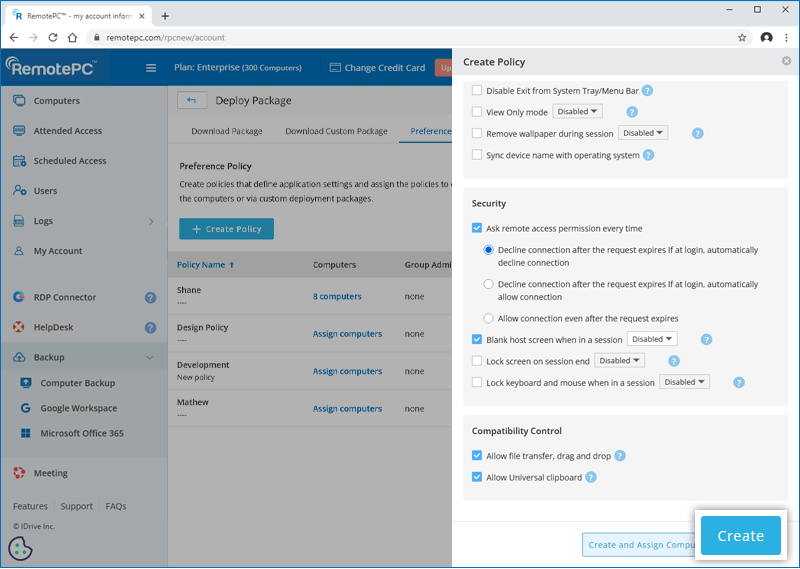
Select this option to require permission before establishing a remote session. Choose one of the following options:- Decline connection after the request expires; if at login, automatically decline connection
- Decline connection after the request expires; if at login, automatically allow connection
- Allow connection even after the request expires
- Blank host screen when in a session
Enable to prevent others from viewing the remote screen during the session. - Lock screen on session end
Enable to automatically lock the remote screen when the session ends. - Lock keyboard and mouse when in a session
Enable to lock all input from the remote keyboard and mouse during the session. - Allow file transfer, drag and drop
Enable to allow file transfer between devices using file transfer or drag-and-drop methods. -
Allow Universal clipboard
Enable to allow copy and paste of text and data between local and remote devices. - Kliknij Create to create the preference policy. The policy will be added to the list of preference policies.
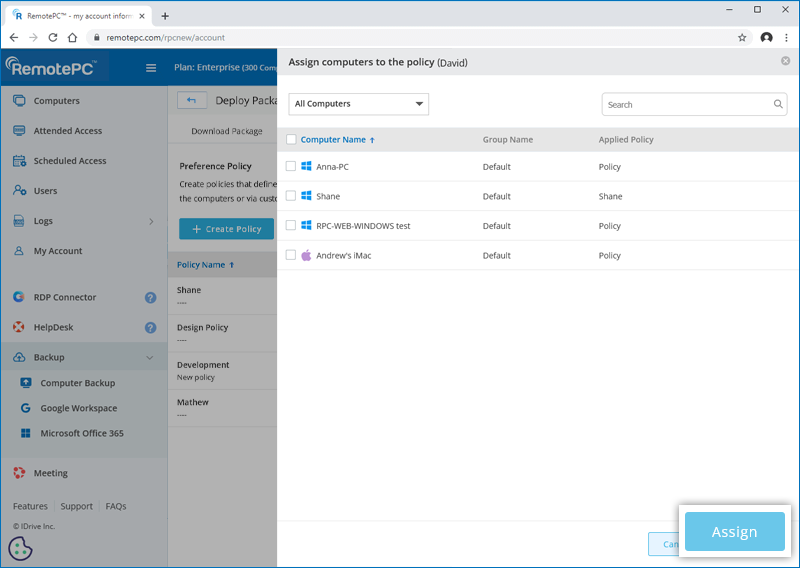
- You can click Assign Computers beside the policy to add computers to the policy.Alternatively, click Create and Assign Computers to create the policy and push it to the required computers.
Ogólne informacje
Bezpieczeństwo informacji
Compatibility Control
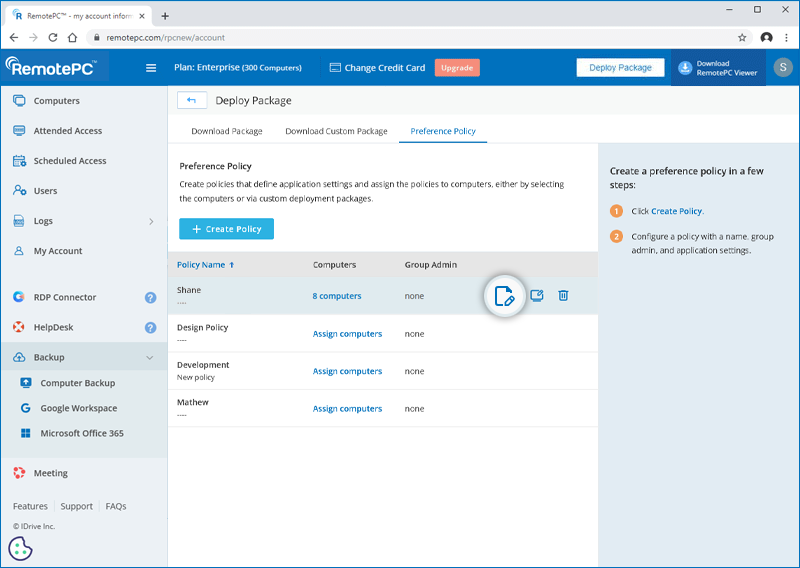
To edit the policy, click
 beside the policy you wish to edit.
 Note: Once preference policies are applied by the admin, users cannot modify these settings during a remote session.
To create a custom deployment package,
- Zaloguj się na swoje konto.
- Kliknij Wdróż pakiet at the top right corner.
- Wejdź na Download Custom Package Następnie kliknij przycisk Create Deployment Package.
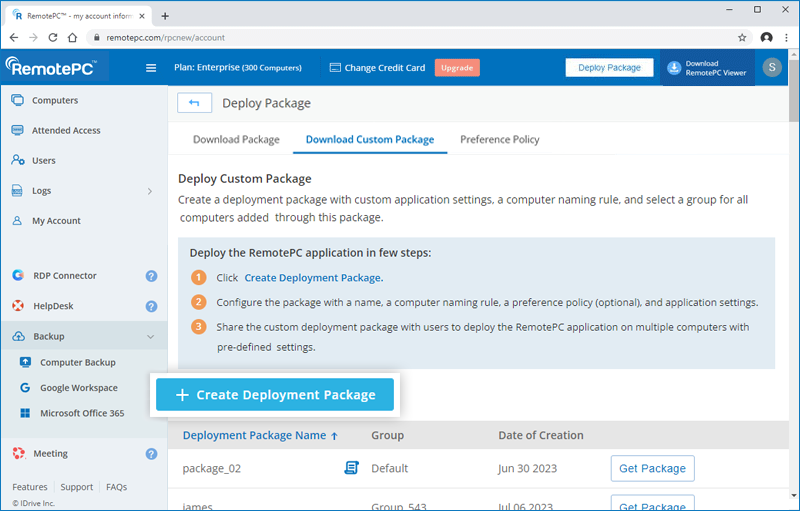
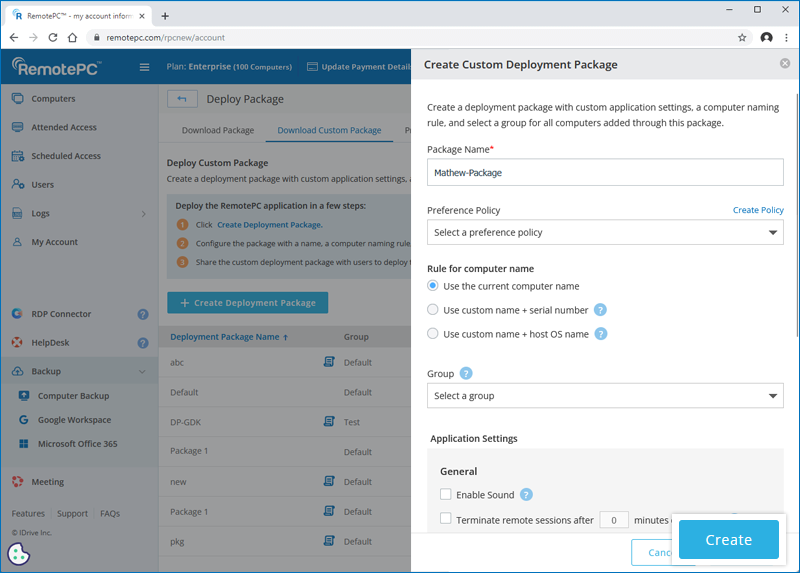
- Configure the package with a name, a computer naming rule, a preference policy (optional), and application settings.
Note: In case a preference policy is selected, few settings are pre-selected based on the chosen preference policy and cannot be modified. - Kliknij Create. The deployment package will be created.
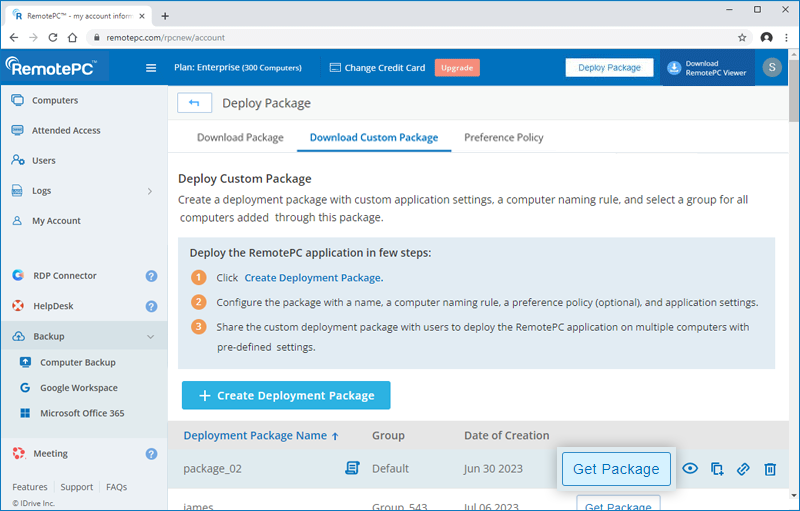
- Download the package on the required computer or copy and share the link with users to deploy the package on computers.
Alternatively, you can access the package later from the Deploy Custom Package tab by clicking Get Package.
Yes, you can deploy RemotePC using a Configuration ID.
To deploy RemotePC,
- Zaloguj się do RemotePC and download the MSI file.
- Open the command prompt window in the administrator mode (c:\windows\system32).
- Copy the configuration ID that is displayed on the right-corner of the page.
- Run this ID in the command prompt for deployment to connected computers.
If there is any problem while attempting to deploy RemotePC via GPO or if the deployment fails, you may receive error 1274 / error 1612 in the 'Event Viewer' logs.
To resolve the issue,
- Open 'Group Policy Management Editor' on your computer.
- Navigate to 'Settings' > 'Policies' > 'Administrative Templates' > 'System' > 'Logon'.
- Double click 'Always wait for the network at computer startup and logon'.
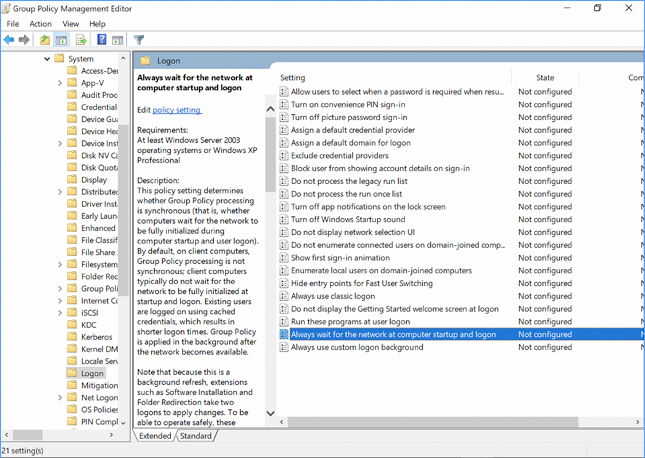
- Select 'Enabled' and click 'OK'.
- Navigate to 'Computer Settings' > 'Administrative Templates' > 'System' > 'Group Policy' and double click 'Startup policy processing wait time'.
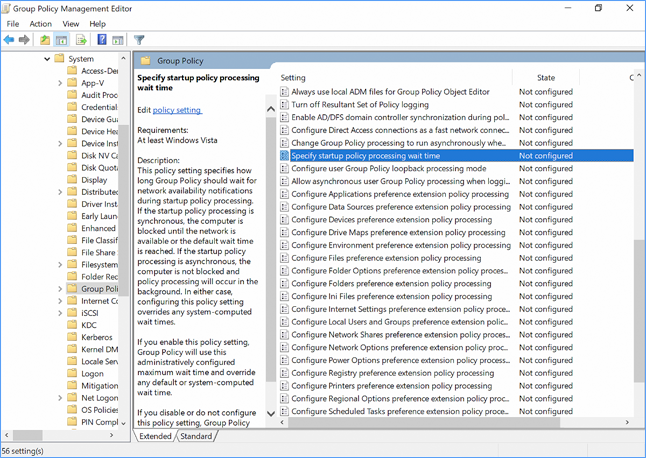
- Enable 'Specify startup policy processing wait time' and configure it to 90 or 120 seconds.
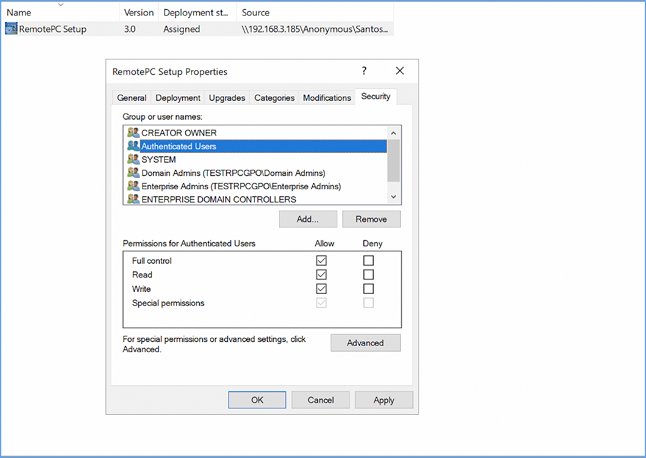
- Go to 'Settings' > 'Policies' > 'Software Settings' > 'Software Installation'.
- Right-click on the package and select 'Properties'.
- Select the 'Allow' checkbox against 'Full Control' and click 'OK'.
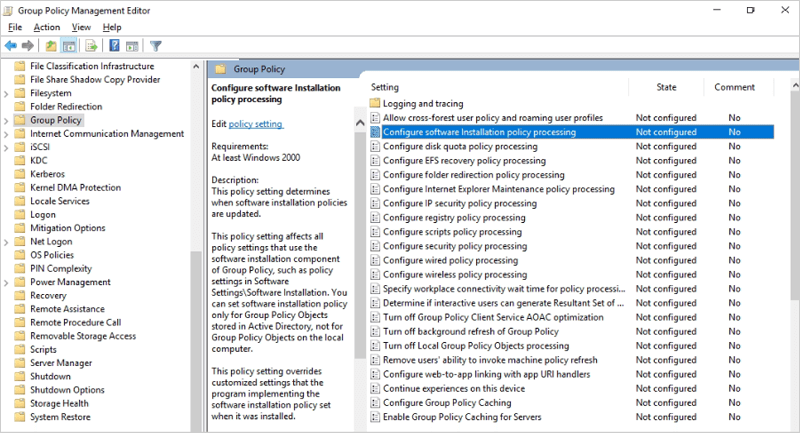
Under Computer Configuration\Policies\Administrative Templates\System\Group Policy,
you need to enable and configure the following 2 options:- Configure software Installation policy processing: Enable and select the 'Allow processing across a slow network connection' checkbox.
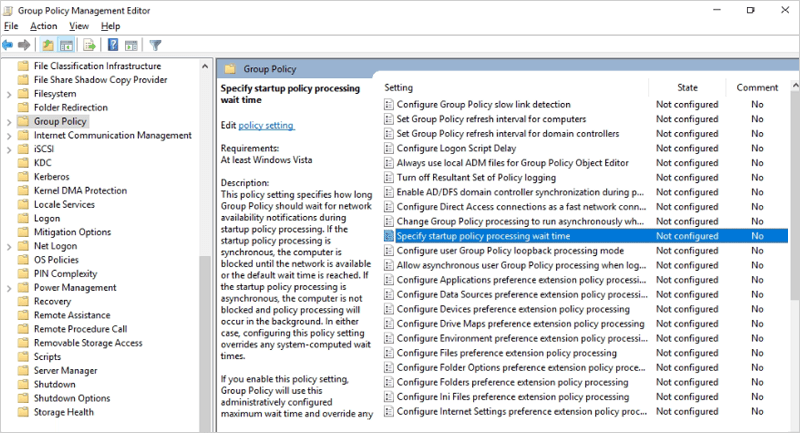
- Specify startup policy processing wait time: Enable and set the 'Amount of time to wait (in seconds)' for 30 seconds.
You need to delete the following GPO registry on the user's computer: HKLM/SOFTWARE/Microsoft/Windows/CurrentVersion/Group Policy
Once you have performed these steps, you may retry RemotePC deployment via MSI.
You can deploy RemotePC by setting up the Group Policy on the host server.
- Go to 'Group Policy Management Editor', right-click 'Software Installation', select 'New' and add a package.
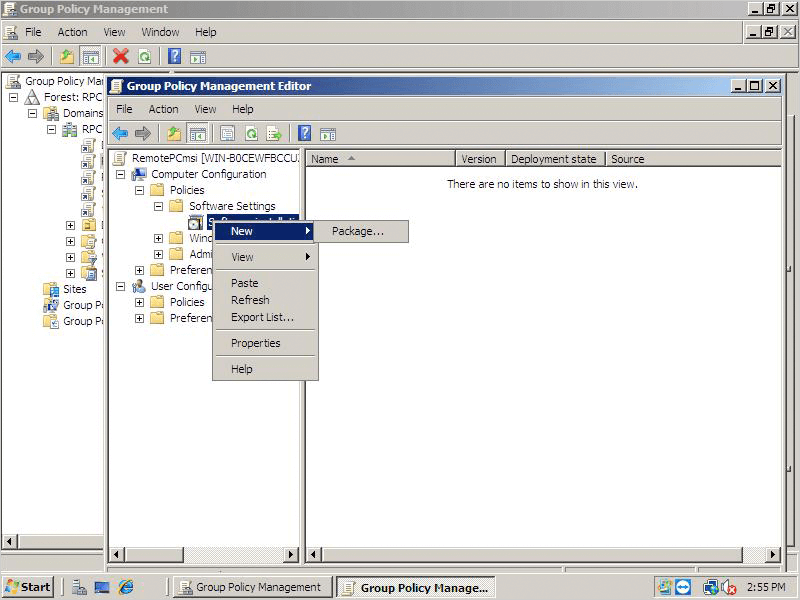
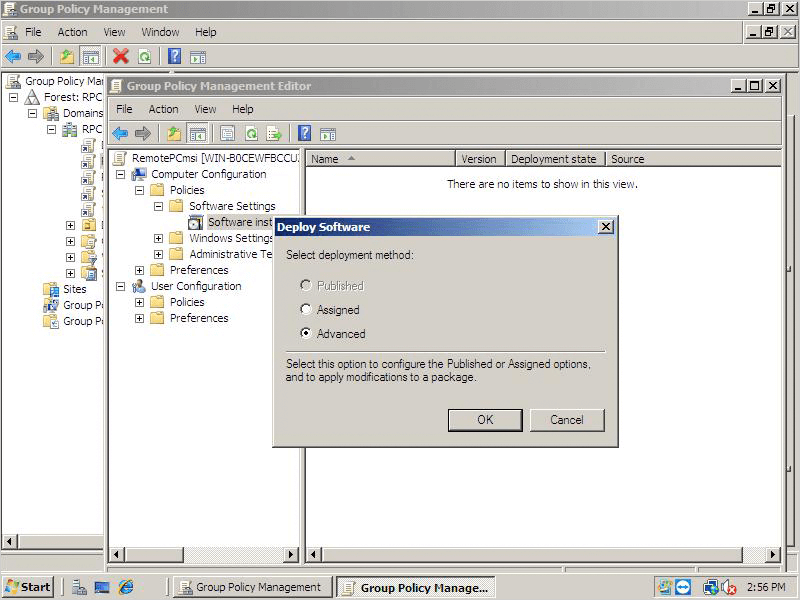
- After selecting the RemotePC MSI file, choose the 'Advanced' option in the popup that appears and click 'OK'.
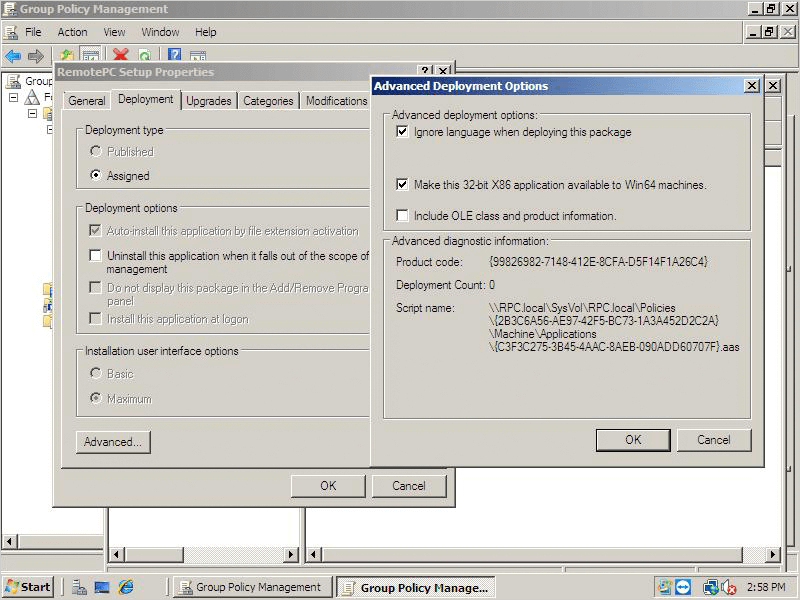
- Go to the 'Advanced Deployment Options' tab, select 'Ignore language when deploying this package'. Click 'OK'.
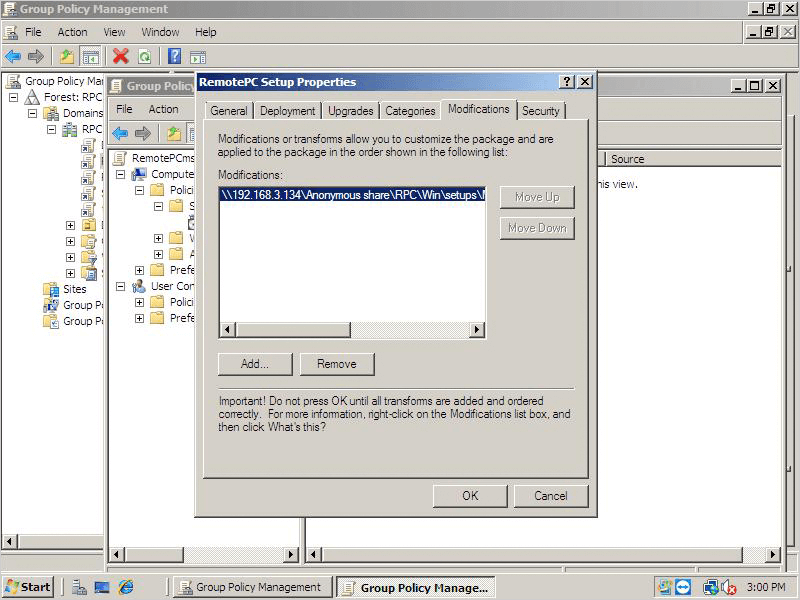
- Go to the 'Modifications' tab in the 'RemotePC Setup Properties' section to add the mst file you just created. Click here to know how to create an MST file via Orca tool.
To deploy RemotePC on devices,
- Open the command prompt, add the command gpupdate /force then click 'Enter'.
- Reboot the computer (required).
- After system reboot, RemotePC will be deployed.
To create a RemotePC.mst file,
- Install Orca, the tool used to edit MSI files.
- Download a new RemotePC.msi file.
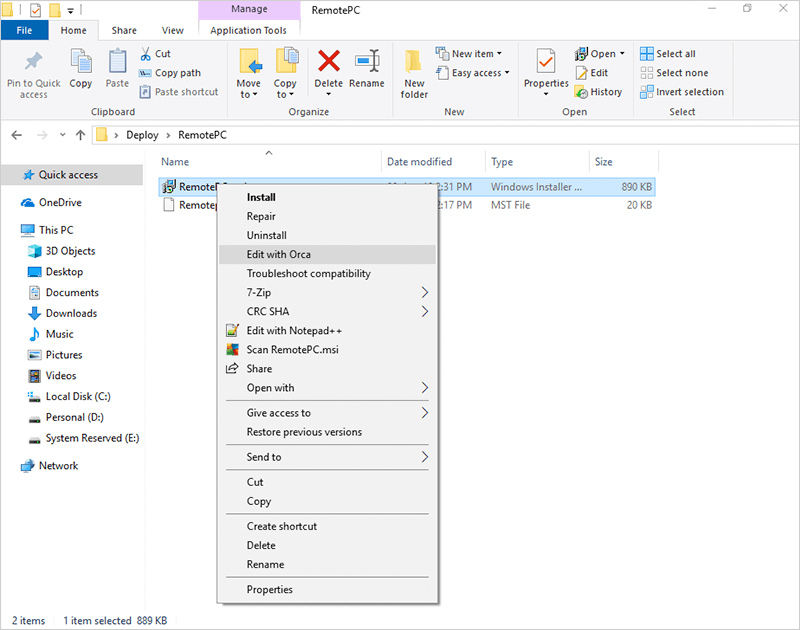
- Open the MSI file location, right-click 'RemotePC.msi', select 'Edit with Orca'.
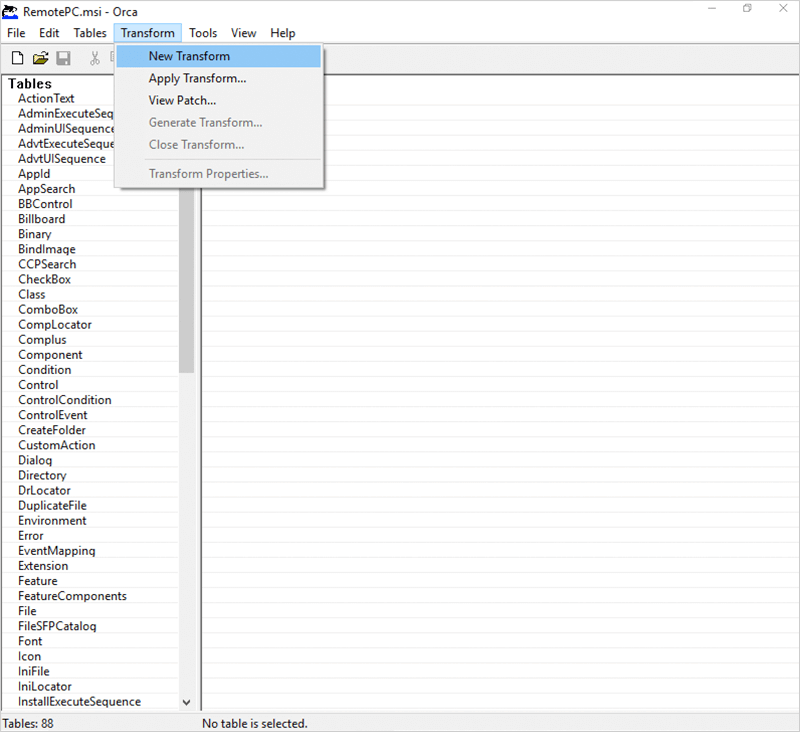
- In the menu that appears, click 'Transform' and then select 'New Transform'.
- Navigate to the 'Property Tab' and edit the following:
- In the 'Add Row' tab, add 'Property' as 'ID' and 'Value' as 'Configuration ID', which is a mandatory parameter. In order to configure optional parameters, add additional rows.
- If your deploy URL is https://www.remotepc.com/rpcnew/sh/FcXuX3JNRerhvng then the Configuration ID is FcXuX3JNRerhvng
- NAZWA komputera powinna zawierać od 1 do 50 znaków.
- Nazwy grup nie mogą zawierać więcej niż 20 znaków.
- In the case of misplaced special character, the machine will be moved to the 'Default' group.
- W przypadku, gdy nazwa grupy nie istnieje, zostanie utworzona nowa grupa o podanej nazwie i zostanie do niej przypisany komputer.
parametry Opis ID This is a mandatory parameter and you can find it under Wdróż pakiet > Wdrożenie grupy za pośrednictwem MSI > ID Konfiguracji: na Twoim koncie RemotePC PERSONALKEY Set a 'Personal Key', which acts as a secondary password, for the remote computer Nazwagrupy Nazwa grupy, do której zostanie przypisany komputer * NAZWA KOMPUTERA Nazwa maszyny przypisanej do hosta DEMONTAŻ Uninstall RemotePC host using the MSI command UNINSTALL=yes
Note: Nie łącz tego z innymi parametramiHIDETRAY 1 Włączenie tej opcji uniemożliwi użytkownikom dostęp do opcji tacki na ich komputerach zdalnych 0 Odkryj tacę i zezwól użytkownikom na dostęp do jej opcji CONNECT_PERMISSION 0 Uprawnienie do żądania połączenia jest wyłączone 1 Automatycznie odrzuć połączenie na ekranie logowania po wygaśnięciu prośby 2 Automatycznie zezwalaj na połączenie na ekranie logowania po wygaśnięciu żądania 3 Zezwól na połączenie po wygaśnięciu żądania USUŃ_TAPETĘ 1 Włączenie tej opcji spowoduje usunięcie tapety podczas sesji zdalnej 0 Tapeta jest wyświetlana podczas sesji zdalnej DISABLE_AERO_THEME 1 Wyłącz motyw aerodynamiczny podczas sesji zdalnej 0 Motyw Aero pozostaje aktywny podczas sesji zdalnej Wyłącz czcionkę 1 Wygładzanie czcionek jest wyłączone podczas sesji zdalnej 0 Wygładzanie czcionek jest włączone DISABLE_SLEEP_MODE 1 Wyłącz tryb uśpienia, gdy host jest skonfigurowany 0 Jeśli ta opcja jest wyłączona, zdalny komputer przejdzie w tryb uśpienia po określonym czasie. Przyspieszenie sprzętowe 1 Użyj przyspieszenia sprzętowego podczas sesji zdalnej 0 Przyspieszenie sprzętowe jest wyłączone CONNECT_TO_ACTIVE_SESSION 1 Włączenie tej opcji umożliwi użytkownikom łączenie się z aktywnymi sesjami RDP na hostach Windows 0 Połączenie z aktywną sesją jest wyłączone POKAŻ_KTO_UZYSKUJE_DOSTĘP 1 Pokaż powiadomienie o tym, kto uzyskuje dostęp podczas sesji zdalnej 0 Ukryj powiadomienie dla tego, kto uzyskuje dostęp podczas sesji zdalnej LOCK_ON_SESSION_END 1 System zablokuje się po zakończeniu sesji 0 System nie zablokuje się po zakończeniu sesji LOCAL_PROXY Użytkownicy mogą przekazywać lokalne szczegóły serwera proxy jako parametry LOCAL_PROXY_IP = 192.168.3.176 LOCAL_PROXY_PORT = 801 LOCAL_PROXY_USERNAME = test LOCAL_PROXY_PASSWORD = test WŁĄCZ DRUKARKĘ 1 Zdalne drukowanie zostanie włączone 0 Zdalne drukowanie zostanie wyłączone Note:
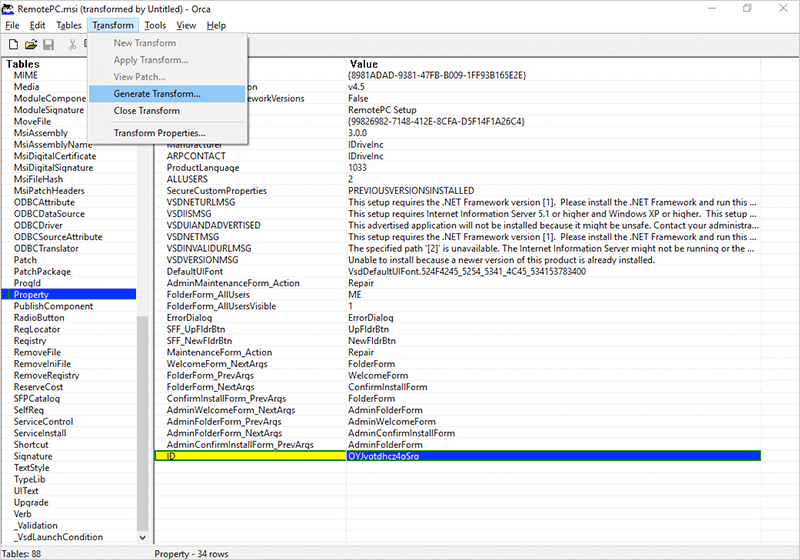
- Go to 'Transform', select 'Generate Transform' to complete the mst creation.
- Deploy with MSI and MST files.
Note:
- If the group name is invalid or not passed, then the computer will fall into the 'Default' group.
- If the personal key is invalid or not passed, then it will be set to a default value (Personal Key).
- If the value for HIDETRAY is invalid or not passed, then the settings will be fetched from the web and applied on the remote computer.
To create a RemotePC.mst file,
- Install Orca, the tool used to edit MSI files.
- Download a new RemotePCViewer.msi file.
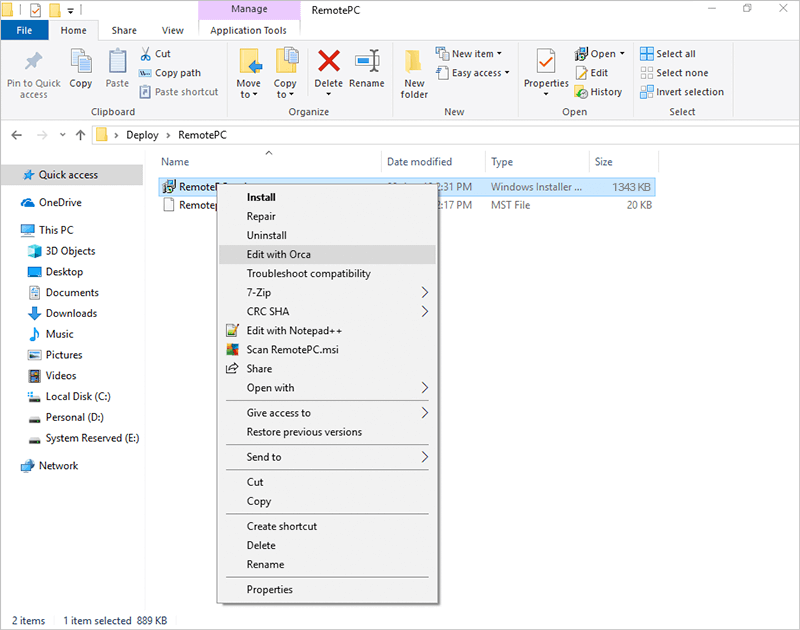
- Open the MSI file location, right-click 'RemotePCViewer.msi', select 'Edit with Orca'.
- In the menu that appears, click 'Transform' and then select 'New Transform'.
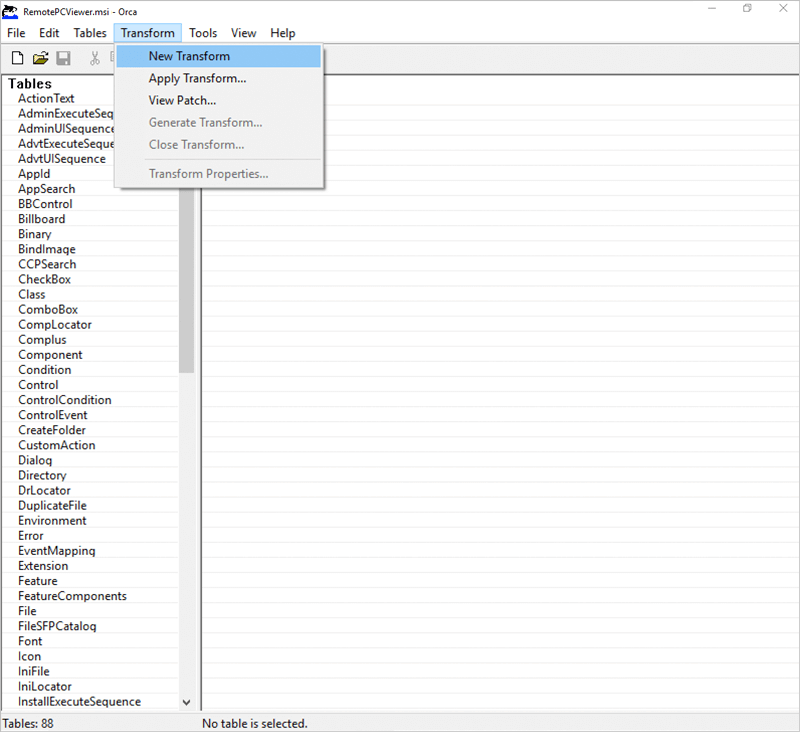
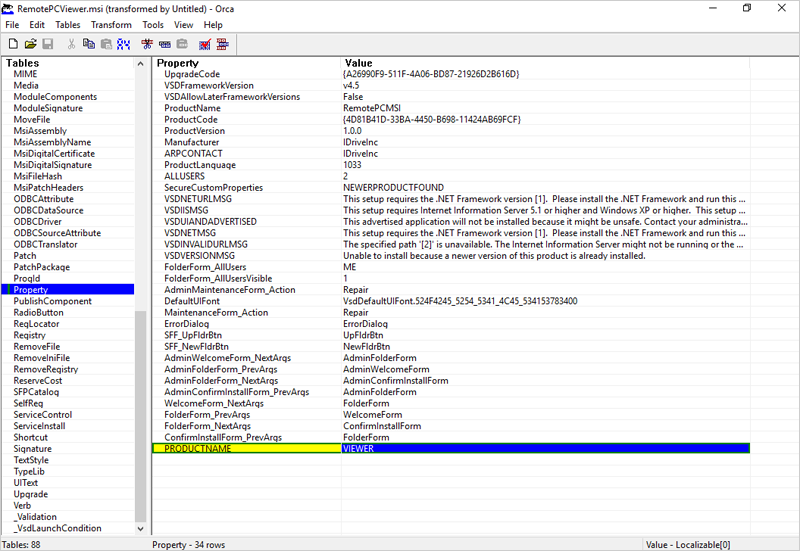
- Navigate to the 'Property Tab' and edit the following:
- In the 'Add Row' tab, add 'Property' as 'PRODUCTNAME' and 'Value' as 'VIEWER', which is a mandatory parameter. In order to configure optional parameters, add additional rows.
parametry Opis NAZWA PRODUKTU Nazwa produktu musi być podana jako „przeglądarka” , aby zainstalować aplikację RemotePC Viewer. DEMONTAŻ Include this parameter along with PRODUCTNAME= viewer to uninstall RemotePC viewer using the MSI command UNINSTALL=yes. - Go to 'Transform', select 'Generate Transform' to complete the mst creation.
- Deploy with MSI and MST files.
To enable connection request permissions in RemotePC Enterprise application,
- Right-click on the RemotePC Enterprise application launcher, and select 'Preferences'.
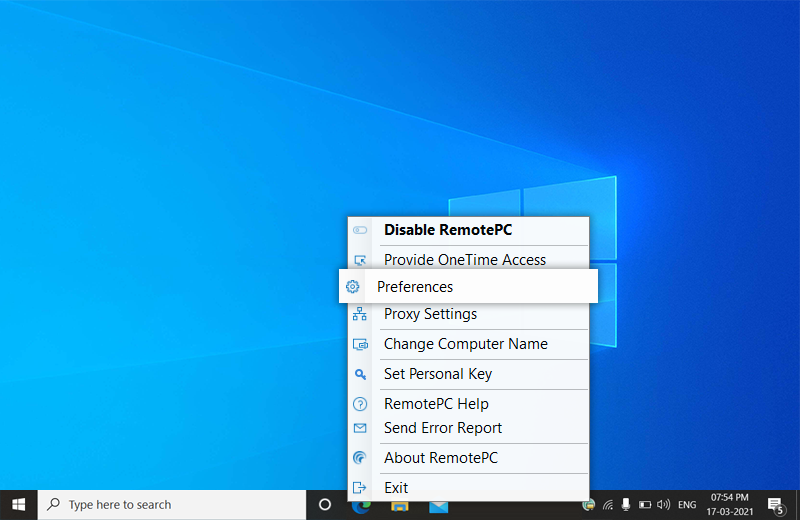
- Under the 'General' tab, select the checkbox to enable 'Connection request permissions' and choose from the following options:
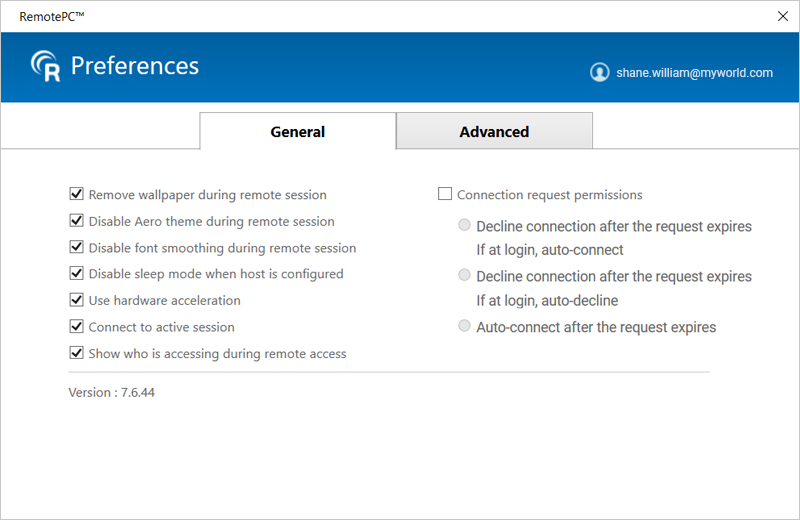
- Decline connection after the request expires
If at login, auto-connect
A popup displays on the remote computer to 'Allow' or 'Deny' the connection request. If none of the options are selected within a time period of 20 seconds, the connection will be automatically denied.
If the computer is locked or not logged into a user, it will connect automatically. - Decline connection after the request expires
If at login, auto-decline
A popup displays on the remote computer to 'Allow' or 'Deny' the connection request. If none of the options are selected within a time period of 20 seconds, the connection will be automatically denied.
If the computer is locked or not logged into a user, it will disconnect immediately. - Auto-connect after the request expires
A popup displays on the remote computer to 'Allow' or 'Deny' the connection request. If none of the options are selected within a time period of 20 seconds, the connection will be automatically established.
- Decline connection after the request expires
If at login, auto-connect
Yes, RemotePC supports headless Linux servers for remote access. You can download and install the RemotePC-Host application on any Linux Headless server and access it remotely.
After the installation, run the following command to configure the machine as a host:
sudo remotepc-host setup
For Enterprise accounts, use the following command to deploy:
remotepc-host deploy <Deployment ID>
For non-Enterprise accounts, use the following command to log in:
remotepc-host loginNote: The following remote access features are not supported for headless Linux servers
- Play remote sound
- Whiteboard
- Chat
- Lock remote computer instantly
- Sticky notes
You can download the RemotePC-Host application using the following links:
Linux Flavor Download Link Debian wget
Pobierz RemotePC https://download.remotepc.com/downloads/rpc/310320/remotepc-host.debRPM wget
Pobierz RemotePC https://download.remotepc.com/downloads/rpc/310320/remotepc-host.rpmYou can view remote access logs for unattended and attended sessions under 'Logs', and web activity logs of your account under 'Activity Logs'.
- Zaloguj się do RemotePC Dołącz przez tę stronę WWWf
- Go to 'Logs' and click 'Unattended Access Logs' for unattended remote session details or 'Attended Access Logs' for attended remote session details.
- Select the date range and click 'Generate'.
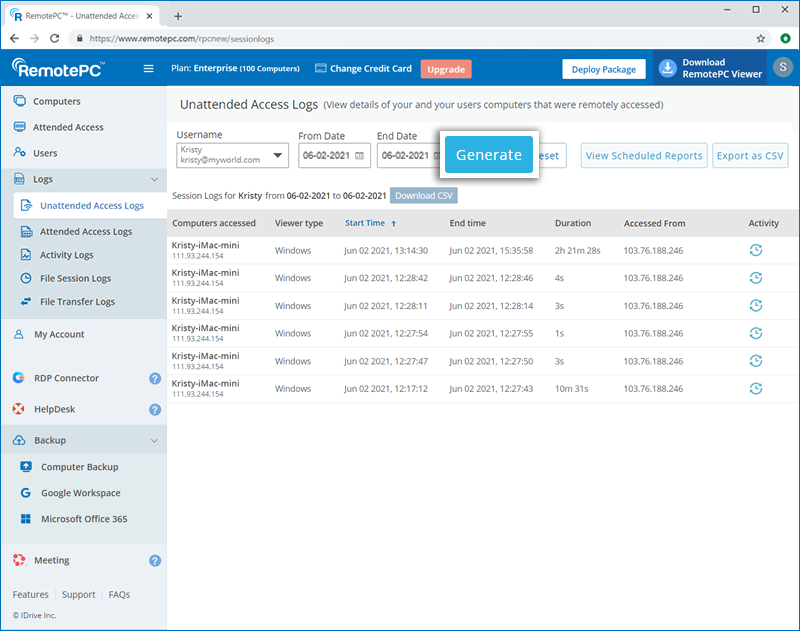
Remote access logs will be displayed with information such as computer accessed, viewer type, start time, end time, and IP address.
To download for the time period between the last 90 days, select 'From Date' and 'End Date' and click 'Download CSV'.
The logs prior to 90 days can be exported as CSV.
To export ,
- Click 'Export as CSV'.
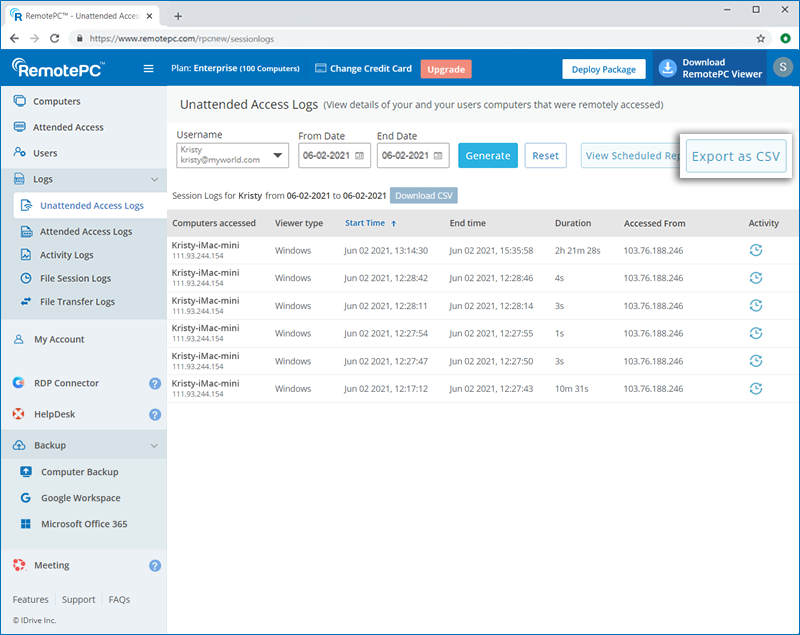
- Select the required username from the drop-down menu.
- Select the month and year and click 'Download'.
To view web activity logs,
- Zaloguj się do RemotePC Dołącz przez tę stronę WWWf
- Go to 'Activity Logs'.
- Select the date range and click 'Generate'.
Web activity logs will be displayed with information such as description, date and time of the last activity and IP address.
Note: Admin can view remote access logs and web activity logs of user accounts too by just selecting the user from the 'Username' drop-down list.
Yes, you can control the features your users can access during remote sessions. These restrictions will not apply on the account owner.
To disable a remote access feature,
- Log in to RemotePC via web browser.
- Click the username displayed in the top-right corner and click 'My Account'.
- Go to 'Settings'.
- Under 'Computer Settings', select any of the required options:
- Disable file transfer, drag and drop - Restrict file transfer and drag-and-drop functionality during remote sessions.
- Disable Universal clipboard - Restrict copy-paste functionality between local and remote computers.
- Disable remote reboot - Restrict users from rebooting the remote system.
- Enable connection with Windows / Mac credentials / Linux credentials - Allow users to connect to remote computers using their system credentials.
- Disable video chat - Disable video chat before establishing a remote connection.
- Disable session recording - Disable the option to record remote sessions.
- Automatically start session recording - Enable or disable automatic session recording using the dropdown.
- Disable pause and stop for session recording - Prevent users from pausing or stopping session recordings.
- Disable simultaneous remote session - Prevent multiple users from connecting to the same computer simultaneously.
- Disable remote print - Disable remote printing
- Disable remote sound - Prevent users from playing sound from remote devices
- Disable in-session indicator - Prevent the in-session indicator from being displayed in the computer list
- Restrict outgoing connections to view-only mode - Allow users to initiate sessions only in view-only mode.
- Set remote session quality - Set the quality of the remote session.
- Send key combinations - Allow sending key combinations to the remote computer.
- Display remote cursor - Display the remote cursor during sessions.
- Disable Block Remote input - Prevent users from blocking input on the remote computer.
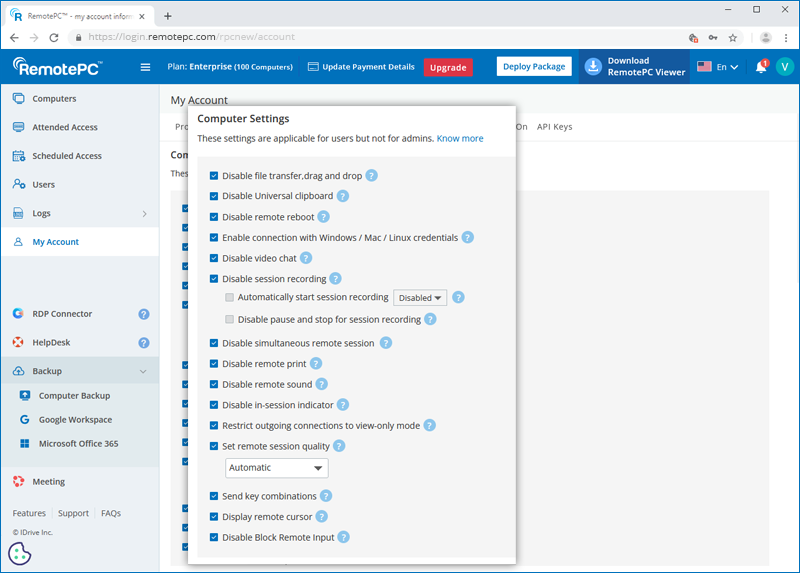
Note: These restrictions will not apply to the account owner.
To access your remote computer using your operating system credentials,
- Log in to RemotePC via the web browser.
- Click your username in the top-right corner and click 'My Account'.
- Go to the 'Settings' tab.
- Select 'Enable connection with Windows / Mac / Linux credential'.
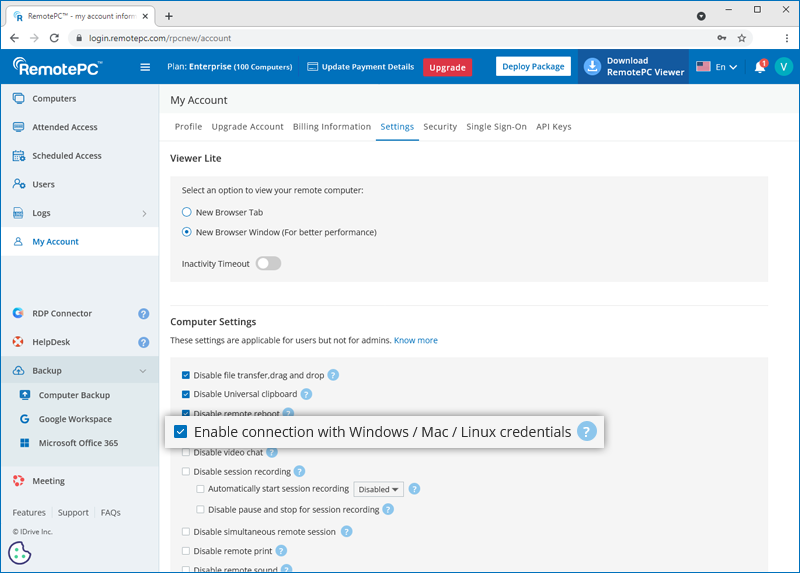
During connection, you will be prompted to enter your Windows/Mac/Linux credentials to sign in.
Note:
- Make sure that the RemotePC application is installed in the remote machine before enabling this option.
- If you disable this option, you can access your computer by entering the Personal Key (if configured).
Yes, admin of Enterprise, Team, and SOHO plans can restrict IPv4 addresses while using the RemotePC desktop application or web browser for remote access.
To allow remote access from specific networks,
- Login to the RemotePC via a web browser.
- Click the username displayed on the top-right corner and click 'My Account'.
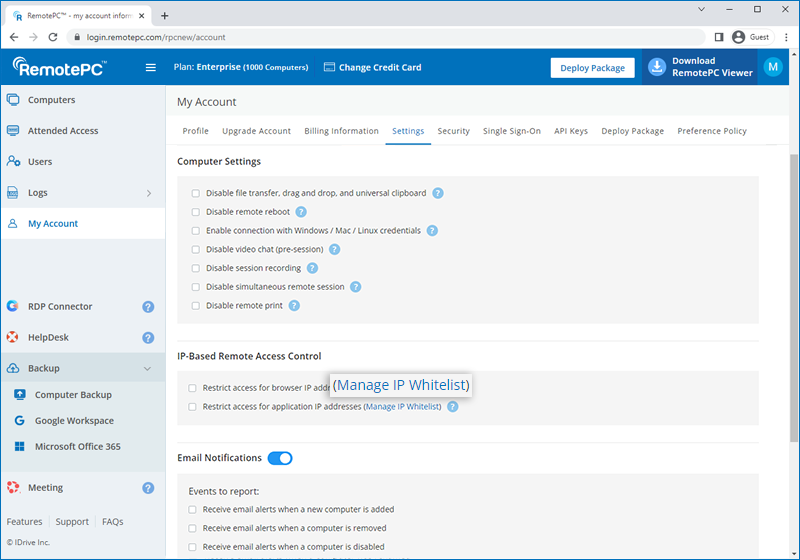
- Go to 'Settings' > 'IP-Based Remote Access Control'. You can select the options to whitelist IPv4 addresses for remote access.

To whitelist public IPv4 addresses for RemotePC desktop application or web browser,
- Select 'Manage IP Whitelist' corresponding to 'Restrict access for browser IP addresses' or 'Restrict access for application IP addresses', respectively.
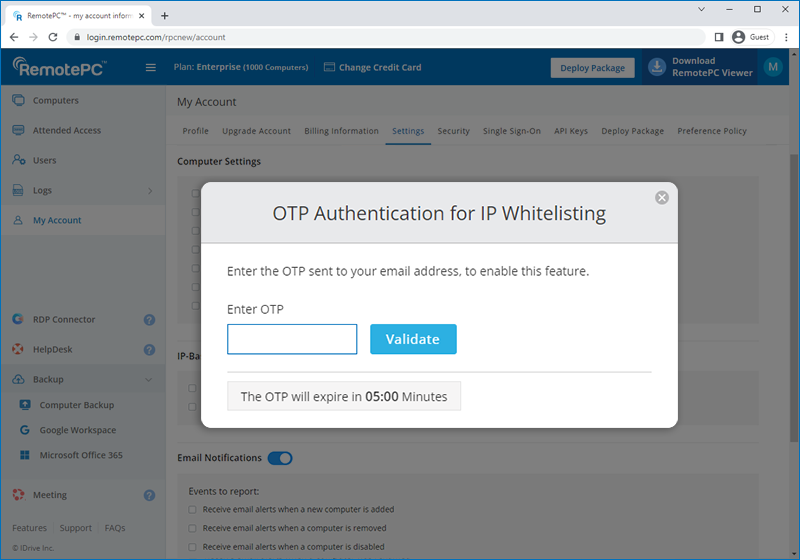
- An OTP will be sent to your registered email address, enter the OTP to validate.
- Enter multiple public IPv4 addresses separated by comma, or enter a subnet to whitelist.
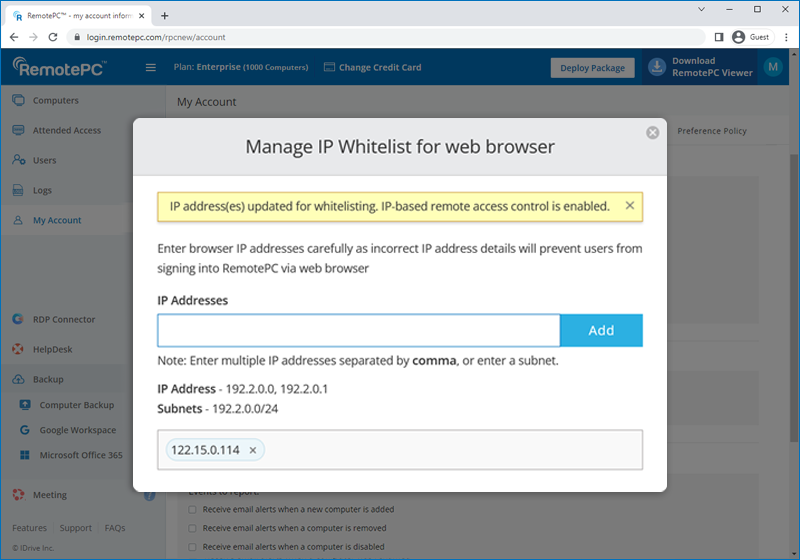
- Click 'Add'.
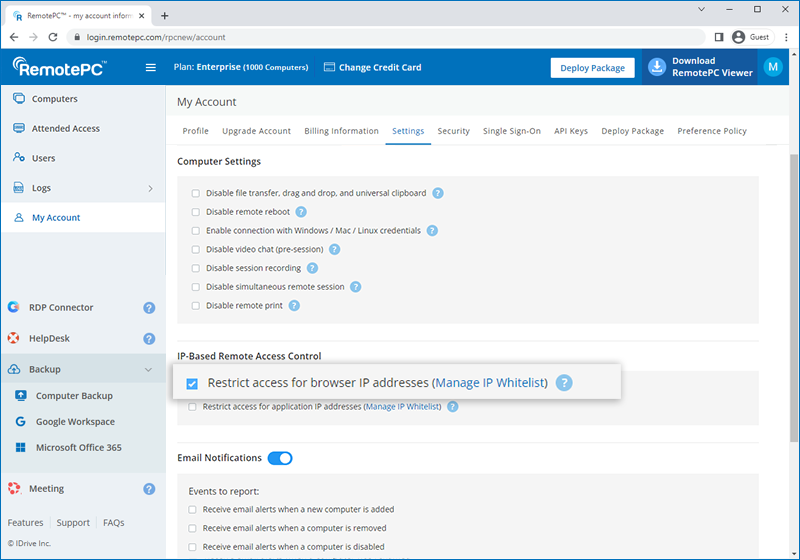
- Once IPv4 addresses are whitelisted in the Settings tab, select 'Restrict access for browser IP addresses' to apply the changes.
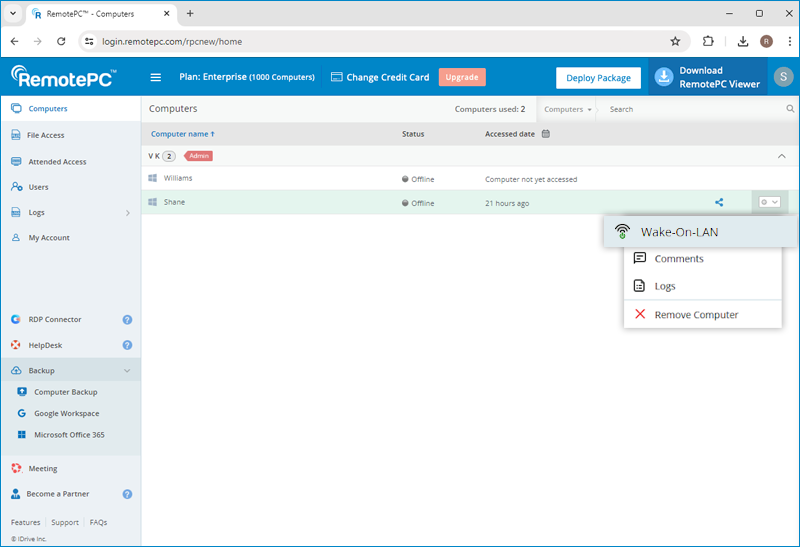
To wake up an offline remote computer after enabling WOL,
- Zaloguj się do RemotePC Dołącz przez tę stronę WWWf
- From the 'Computers' tab, click
 displayed next to the offline computer to wake up that computer.
- Select 'Wake-On-LAN'.
Note:
- 'Drag and Drop' feature is not available for connections via Linux machines.
- Some options like 'Session Recording' and 'Send key combinations' will not be available while using RemotePC™ Viewer Lite.
Yes, you can install the RemotePC application on multiple PCs, Macs, and Linux machines using the 'Deploy Package' function.
You can either install the RemotePC Host application on the computers that you want to access or deploy the host application on computers at multiple locations by sharing an installation link with the users.
You can also install the RemotePC Viewer application on your computers and use them only to access remote computers.
To enable remote access or deploy,
- Zaloguj się do RemotePC Dołącz przez tę stronę WWWf
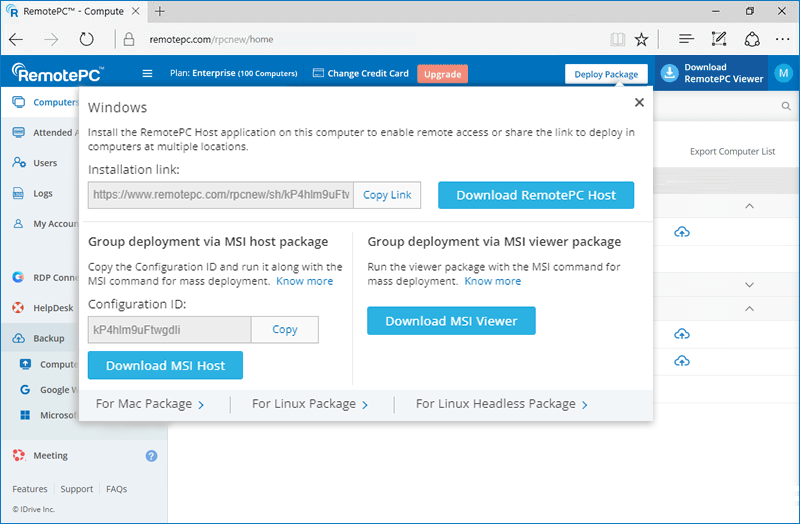
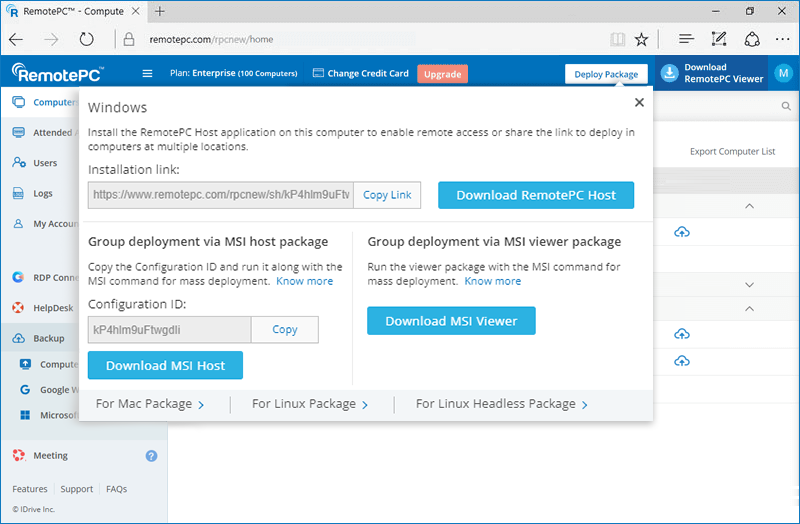
- Click 'Deploy Package' displayed on the top-right corner of the page.
- For Windows and Mac host, click 'For Windows Package' or 'For Mac Package' respectively, and perform any of the following:
- Click 'Download RemotePC Host' to install the RemotePC application on the computer you are logged in and enable remote access.
- Share the provided link with the users to deploy the RemotePC application on other computers.
- Click the 'Download MSI' button, copy the configuration ID and run it along with the MSI command for mass deployment in Windows. Know more.
Or
Click the 'Download Package' button, and install the package via Apple Remote Desktop or Jamf Pro to perform mass deployment in Mac. Learn more.
- For Linux, click 'For Linux Package' and perform the following:
- Download the Debian or RPM host setup package depending on the distribution of your Linux computer.
- Install the download packages by running these commands:
- For Debian:
sudo apt update
apt install ./remotepc.deb - For RPM:
sudo yum update
yum install ./remotepc.rpm
- For SUSE:
sudo zypper update
sudo zypper install ./remotepc-suse.rpm
Note: Use 'dnf' if 'yum' is not available
- For Debian:
- Deploy the package by running this command with the 12-digit deployment code:
remotepc-host deploy <Deployment Id>

To install the RemotePC Viewer application,
- Log in to RemotePC via web browser.
- Click 'Download RemotePC Viewer' appearing on the extreme top-right corner of the page.
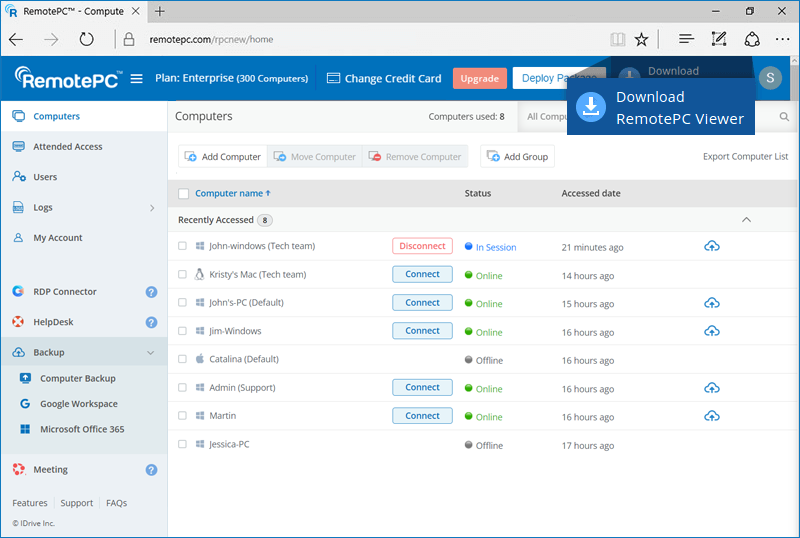
This will download the RemotePC viewer application on your PC or Mac. For Linux machines, download the viewer setup for Debian or RPM distributions and follow the instructions.
RemotePC is compatible with Windows devices running on Intel, AMD, and ARM processors.
To learn which versions of Windows are supported, click here.
Yes, as an Admin of Enterprise account, you can enable the option to remotely connect to your computer with your Windows / Mac credentials. On enabling, the feature will apply to all the users linked to your account.
To enable,
- Log in to RemotePC via web browser.
- Click the username displayed on the top-right corner and click 'My Account'.
- Go to 'Settings'.
- Under 'Computer Settings', click the checkbox 'Enable connection with Windows / Mac credentials'.
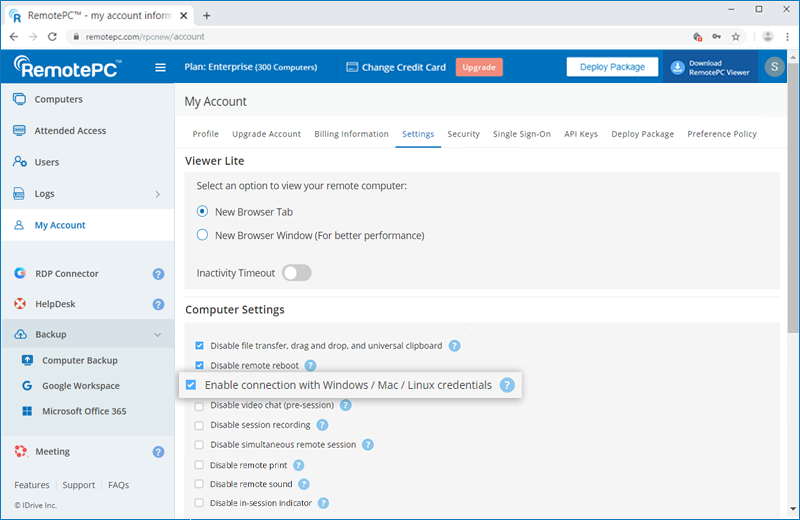
Once enabled, you can establish connection with your remote computer via the web or desktop application,
- Click the 'Connect' button.
- If the Personal Key is enabled, an additional field 'Advanced' appears. Click the same, and enter your Windows / Mac credentials.
- If the Personal Key is not enabled, enter your Windows / Mac credentials directly on the screen that appears.
Note: Make sure your remote computer is password protected, as it is mandatory to enter your Windows / Mac password to proceed.
- Click 'Connect'.
Note: SOHO and team plan users can enable this option from the Preferences section of the remote computer.
As an Admin of Enterprise account, you can configure your computer by downloading the setup from the 'Deploy Package' section in the web interface. You can also share the URL in this section with a user linked to your account; which the user can use to download the setup.
However, the setup can only be used once. So every time you wish to add a new computer, you need to download the setup again from the 'Deploy Package' section.
RemotePC On-premise is a remote access and remote support solution hosted on the premise of an organization or within their datacenter. Being located close to the user, it provides better and faster remote access capabilities with highest security compliance.
Yes, you can pay monthly for RemotePC SOHO, Team, and Enterprise plans. Any add-on such as Remote Backup, RDP Connector, HelpDesk, etc will be billed within the monthly payment cycle. You may also make plan upgrades with monthly payments or switch to yearly plans.
- Open the file, delete the sample entry and add the information for your users in any of the following formats (one line per user):